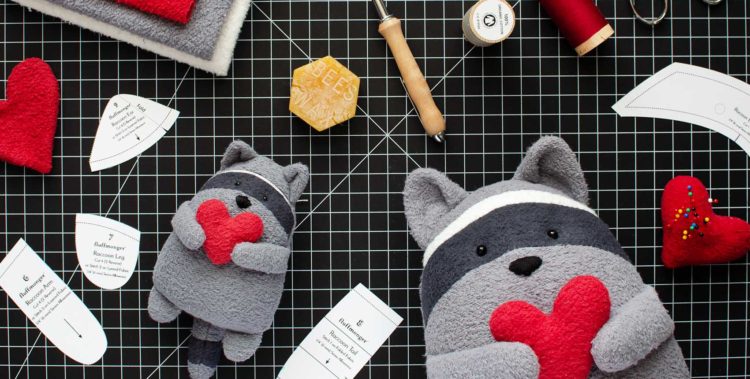
Scrabbles the Raccoon Free Sewing Pattern and Tutorial
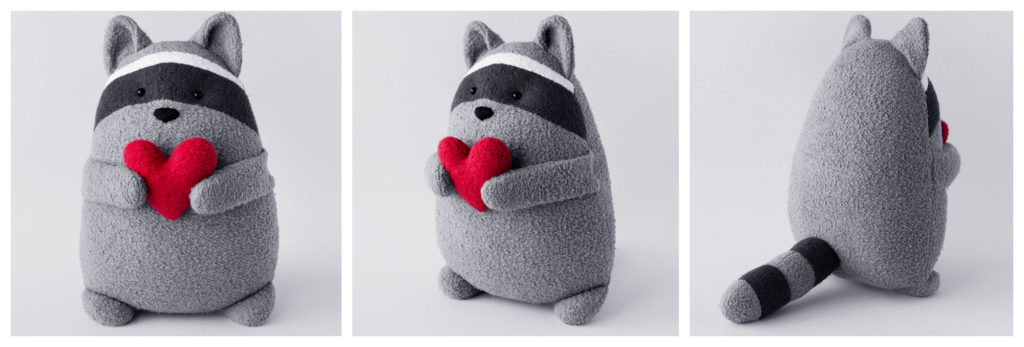
On April 10, 2018 by fluffmongerWith Mother’s Day right around the corner, I took inspiration from one of my mom’s favorite animals for creating my latest plush design. She loves raccoons, and I’m sure she would have one as a pet if she if could (I think I get my obsession with animals from her ?). I made a raccoon last year, but I wanted to share a pattern that was a bit more user-friendly. Scrabbles the Raccoon free sewing pattern is easy to sew and is available in two sizes!
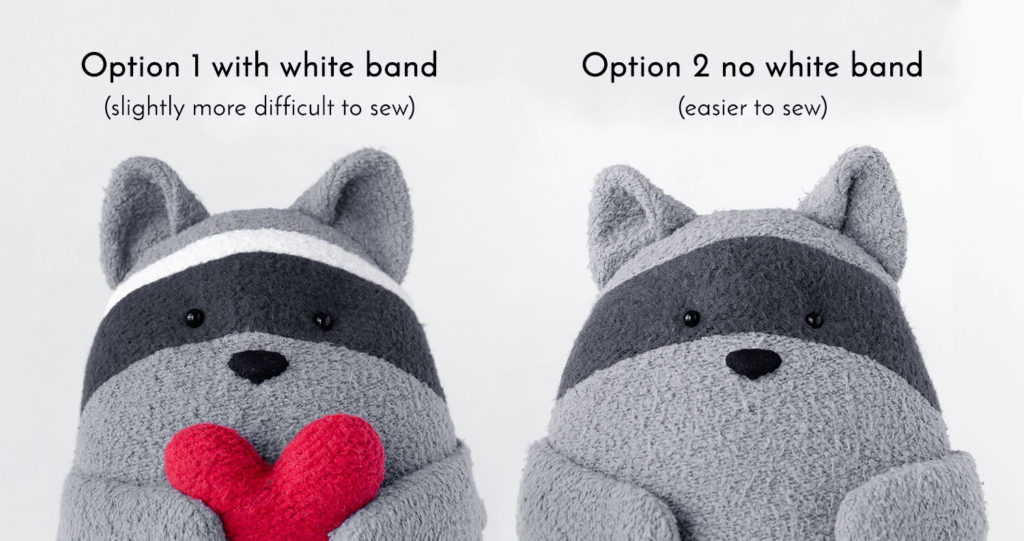 The pattern comes with two options for the raccoon face stripes. Forehead option 1, which is what I sewed for this tutorial, comes with a white band. Option 2 is slightly easier to sew but is just as cute!
Materials
Fabric colors are only suggestions. Feel free to switch them up! Make a brown raccoon or give your raccoon dark arms, legs, and ears to match the eye band!
To make the full-size raccoon you’ll need:
-
- Light gray fleece (I’m using hand-dyed organic cotton and hemp fleece for which I have kits here) — you’ll need approximately 1/3 yard (see cutting layout below)
- Dark gray fleece — you’ll need approximately 1/4 yard
- A scrap piece of white fleece (if making the raccoon with a white band)
- A scrap piece of red fleece for the heart
- Black embroidery floss/yarn OR Black felt for nose and eyes
- Stuffing (I’m using organic carded wool from a local farm, but I also like this organic roving
*. You can also use fiber stuffing, like this one made from recycled plastic bottles
*)
- Matching all-purpose thread (I carry organic thread in my Etsy shop)
- Marking tool (like this disappearing pen* or this water soluble pen*)
- Scissors
- Pins or clips*
- Tool for turning and stuffing (like these hemostat clamps*)
- Doll Needle
Links with an asterisk (*) are affiliate links. If you make a purchase through one of them, I get a small percentage of the sale with no extra cost to you.
If you sew your raccoon with natural fleece, I recommend using a 90/14 ball point needle; and if you sew with organic cotton thread, I recommend making your final stitch a stretch stitch (a stretch stitch is fairly permanent, so baste first when needed).
Printing the Patterns
Get access to the free pattern, as well as access to all my other free patterns, by clicking the button below.
Print pattern at 100%. Use card stock for detailed pieces like the forehead on page 4 of the PDF. (See a tutorial on printing and assembling patterns here.)
Tracing the Pattern
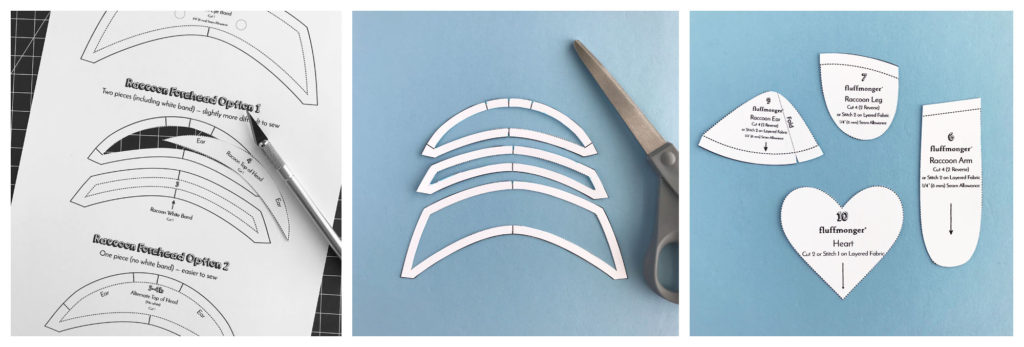
- For the detailed forehead pieces, you’ll want to trace the stitch line and the seam allowance. (Printing these pieces on card stock and using a craft knife will allow for easier tracing.)
- Cut out pattern.
- I find it easier to trace the stitch line for small pieces and sew on folded/layered fabric, so I’m using the arm, leg, ear, and tail pattern pieces with only the seam allowance at the very end.
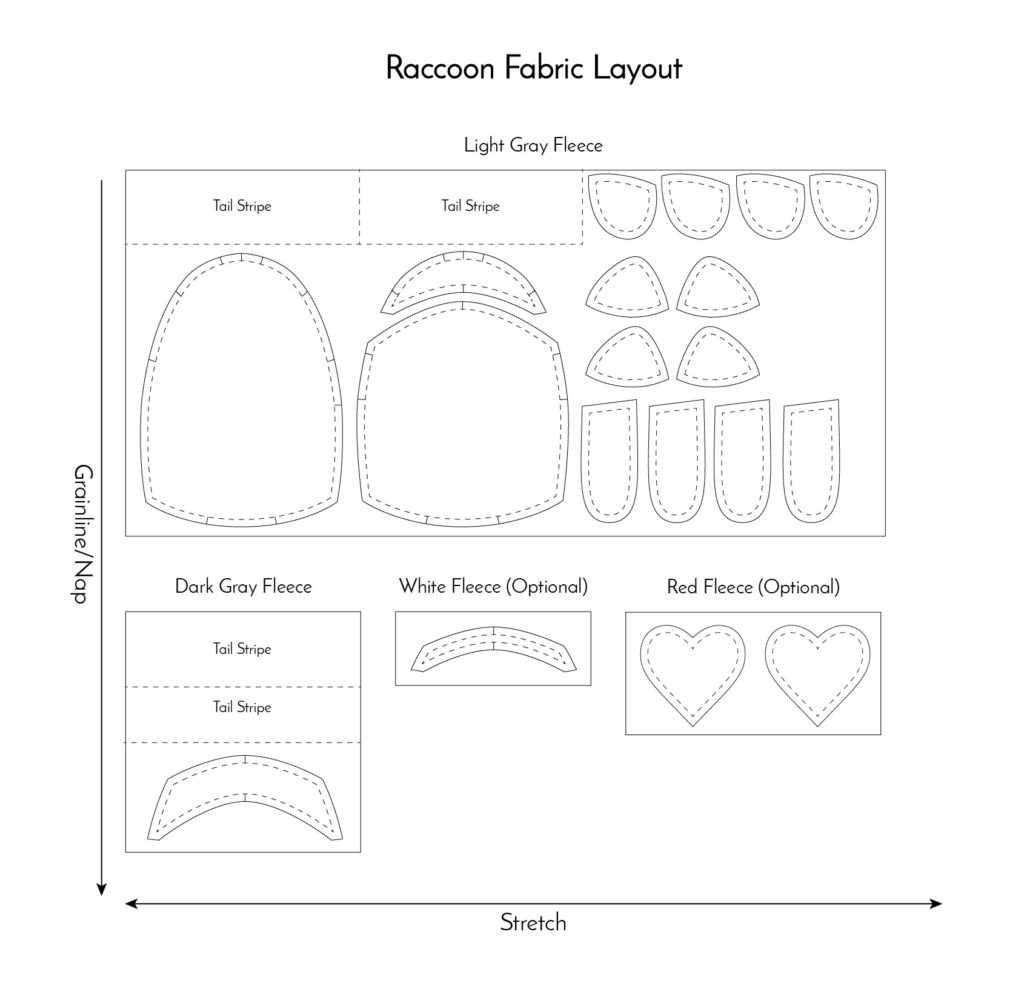
Line up arrows with grainline/nap direction of fabric. Trace all pieces (except the tail) and transfer all markings.
For the tail stripes, cut a 1.5″ x 8″ and a 2.5 x 8″ strip from both the light and dark fabrics for a total of 4 strips.
Sewing the Ears
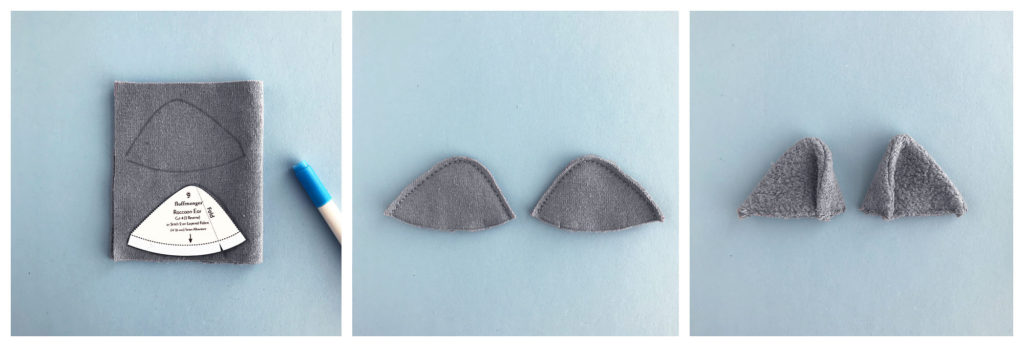
- Trace stitch line of ears on folded/layered fabric.
- Stitch around ears and cut out.
- Turn ears right side out. Run your hemostat clamps around the seams. Press if needed. Baste stitch ears 1/8″ from bottom edge. Fold inner edge of ears over at indicated marking. Baste stitch again across the bottom to hold ears in folded position.
Sewing the Arms and Legs
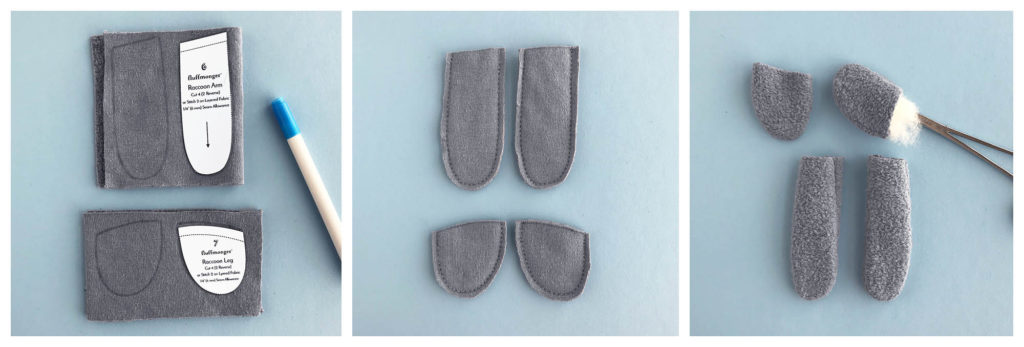
- Trace the stitch line for the arm and leg pattern pieces on folded/layered fabric.
- Stitch and cut out arms and legs.
- Turn arms and legs right side out. Run hemostat clamps around the inside seams to help them fully open. Stuff arms and legs about 2/3 full. Baste the leg and arm openings closed 1/8″ from edge (optional).
Sewing the Body Front
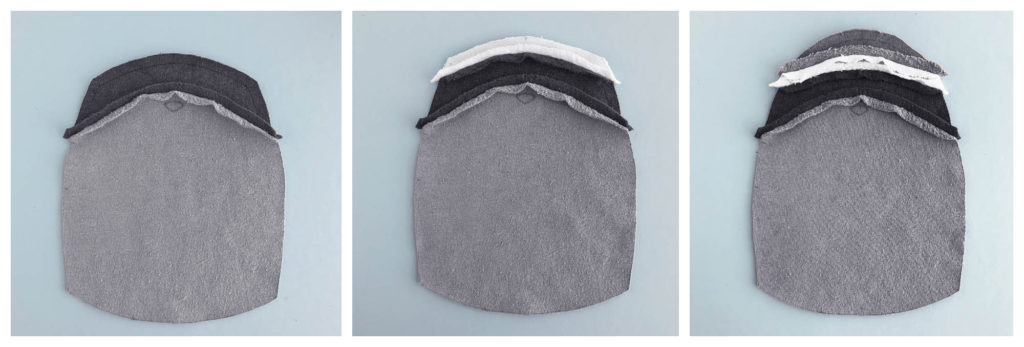
- Cut out belly and choice of forehead pieces. (Forehead option 1, which is what I sewed for this tutorial, comes with a white band. Option 2 has only 1 band for the eyes and is slightly easier to sew. If you choose to sew option 2, cut out the forehead pieces for option two and skip the step for stitching the white band.) Pin pieces 1 and 2, RIGHT sides together. Sew with 1/4″ seam allowance. If you are new to sewing curves, baste stitch before sewing the final stitch. (See a video on sewing curves here.)
- If sewing forehead option 1, pin pieces 2 and 3, RIGHT sides together, and stitch with 1/4″ seam allowance. (If sewing option 2, skip this step.)
- Pin top of raccoon head (piece 4 or “alternate top of head”) to the top and stitch with 1/4″ seam allowance. Trim the seam allowance of bands to 1/8″ and finger press open.
Assembling the Body
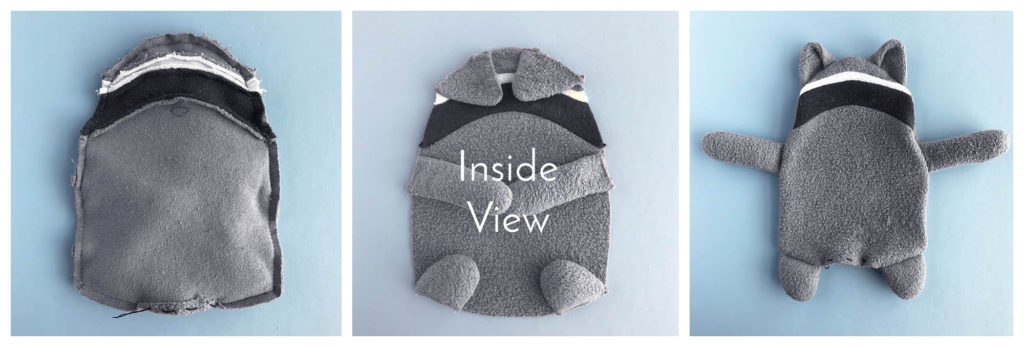
- With RIGHT sides together, stitch front of raccoon to back piece around U shape, leaving the openings for ears and arms.
- Insert the the ears, arms, and legs in positions shown in “inside view.” Make sure the insides of the ears are touching the body side with the face, and make sure the folded edges of ears are facing the center. Stitch arms, ears, and legs in place.
- Baste the seam allowance around the opening. Clip curves and corners, and turn raccoon right side out.
Make sure you have your eye and nose positions marked on the right side of the fabric. At this point, you can make the eyes and nose, or you can wait until after stuffing. I like to wait until then end so I can needle sculpt the eyes.
There are a number of options for the eyes and nose:
- You can make them with felt and machine or hand-stitch them 1/8″ from edge, like I did in the Doodles the Deer tutorial.
- You can use a satin stitch for the nose and make embroidered knot eyes with embroidery floss or yarn (here’s a video tutorial on embroidering eyes with a French or colonial knot).
- You can use glass eyes if your raccoon is not intended for a small child. (I have a tutorial here for using glass beads for eyes.)
- You can use a plastic safety nose and eyes. Note that safety eyes/noses are not intended for small children, and I do not recommend using them with natural-fiber fabrics, like organic fleece. (Safety eyes typically require a small amount of fusible stabilizer or Fray Check to prevent holes in stretch fabrics.)
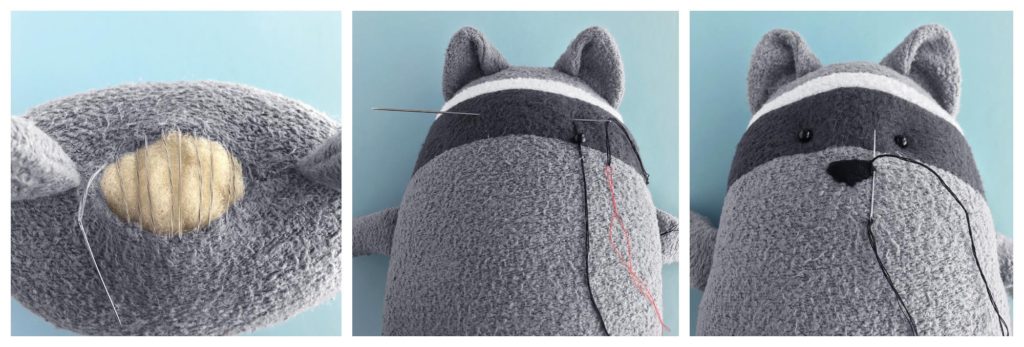
- Stuff the body firmly and close with a ladder stitch (here’s a video tutorial on how to ladder stitch).
- If you haven’t already, make the eyes and nose. If you’d like to needle sculpt your eyes, here’s a video tutorial. And here is a tutorial for using glass beads for eyes.
The Tail
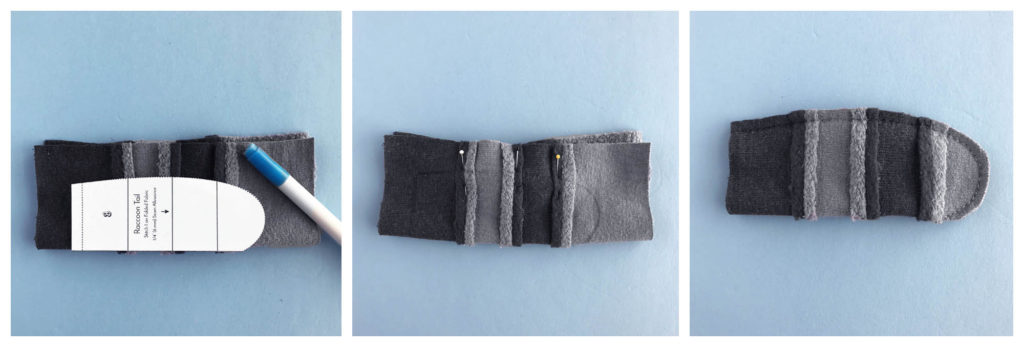
- Stitch tail strips together with 1/4″ seam allowance (dimensions for strips are under “tracing the pattern”). Keep the two narrow strips toward the center and the wider strips on the on the outermost sides. Fold fabric and trace stitch line of tail.
- Use pins to ensure the stripes are lined up properly before stitching.
- Stitch around tail and cut out.
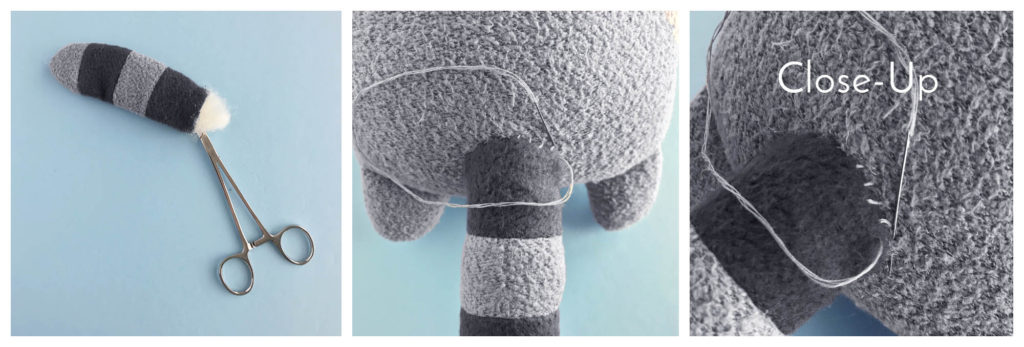
- Flip tail right side out. Stuff all the way to the end and fold the 1/4″ seam allowance toward the inside.
- Ladder stitch tail to indicated area on back. Secure a knot and bury the thread tails. (Here’s a video on attaching parts with a ladder stitch.)
Attaching Heart
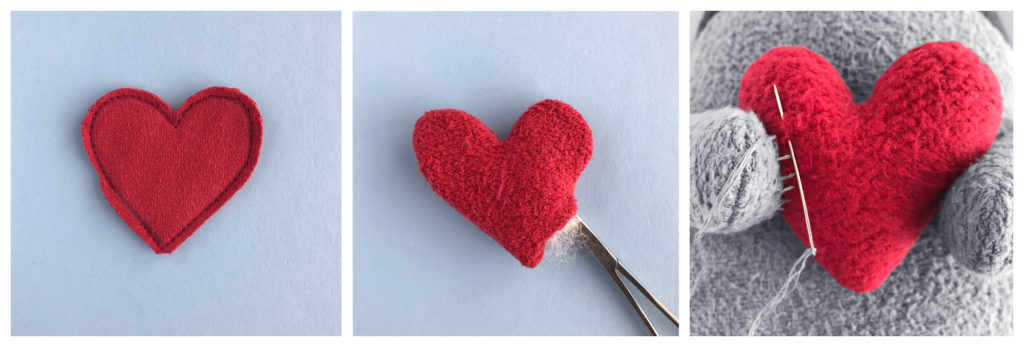
- Trace heart on folded/layered fabric and stitch around heart, leaving indicated opening for turning.
- Flip right side out, stuff, and close with a ladder stitch.
- Attach heart to paws using a ladder stitch.
Sewing a Tiny Raccoon
Tiny Scrabbles can be sewn entirely by hand or using a combination of machine-stitching and hand-stitching. The tiny raccoon is made using the same instructions as the large version with a few exceptions:
- The tiny raccoon pattern does not include a seam allowance due to the number of small, detailed pieces. You will need to trace the stitch line for all pieces then add in your own seam allowance.
- Stitch the curves by hand or at least baste by hand before stitching on the machine.
- Use only embroidery for the eyes and nose.
- The tiny raccoon pattern comes with only one forehead stripe. The white band is too small to sew, but you can add a white stripe with embroidery floss or white thread to create a strip , if desired. (To make the small stripe, I threaded an embroidery needle with white thread, anchored it under the left arm with a knot, inserted the needle into the body under the arm, came out through the left top corner of the dark eye band, pulled the thread across the top of the dark band, inserted the needle on the top right corner of the dark eye band, pulled the needle out under the right arm, tied a knot, and buried the thread tail.)
- For the tiny tail stripes, cut a 1″ x 4″ and a 1.25″ x 4″ strip from both the light and dark fabrics for a total of 4 strips.
Organic Fabric Kits
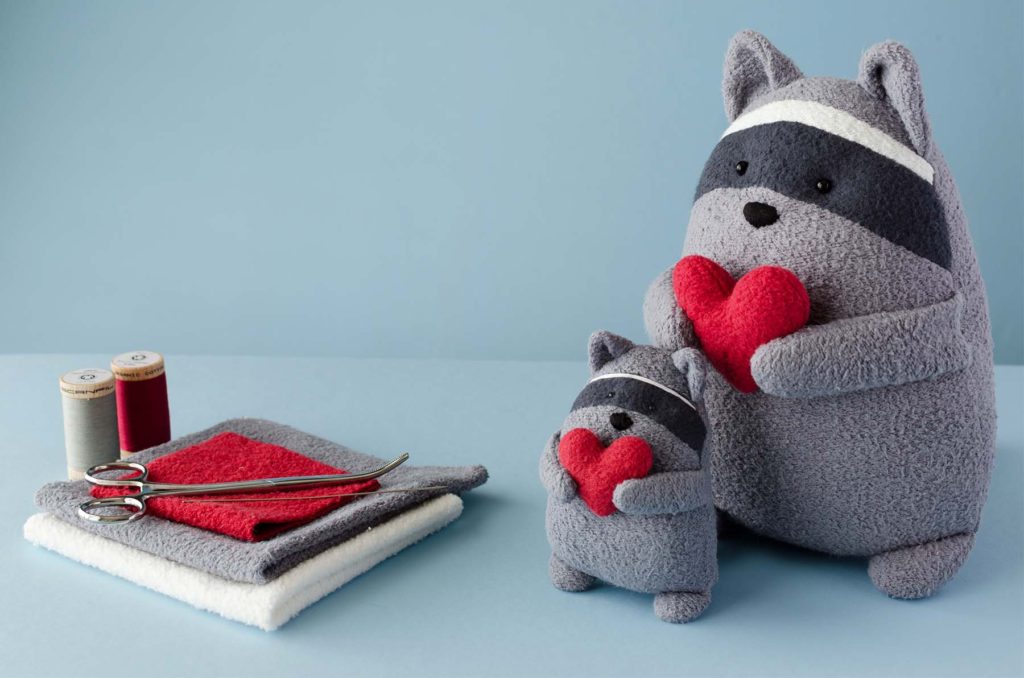
If you’d like to try sewing a raccoon with organic fabric, I have fabric kits available with just the right amount of hand-dyed organic fabric to complete the project. I also have Pick 2 Kits for sewing both a full-size and a tiny raccoon.
I’d love to see what you make! Share photos of your Scrabbles the Raccoon in my Fluffmonger Patterns group on Facebook!
Selling Items Made with this Pattern or Creating Derivative Works
This pattern may be used to create handmade toys to sell, but items may not be mass-produced. Please give credit to Fluffmonger with “pattern by Fluffmonger” and a link to my website, www.fluffmonger.com on your tags and listings.
If you modify the pattern or use certain pieces to create another pattern, still credit Fluffmonger, as these are considered derivative works.
This design is protected by federal copyright law (© 2018) and may not be reproduced in any form. Reproduction of this design, either in part or whole, or distribution of this pattern electronically or by hard copy is strictly prohibited.
39 comments
Leave a Reply Cancel reply
Archives
- March 2021
- February 2021
- April 2020
- January 2020
- November 2018
- July 2018
- April 2018
- March 2018
- February 2018
- January 2018
- December 2017
- November 2017
- October 2017
- March 2017
- February 2017
- November 2016
- October 2016
- September 2016
- August 2016
- July 2016
- June 2016
- March 2016
- February 2016
- January 2016
- December 2015
- November 2015
Calendar
| S | M | T | W | T | F | S |
|---|---|---|---|---|---|---|
| 1 | 2 | 3 | 4 | 5 | 6 | 7 |
| 8 | 9 | 10 | 11 | 12 | 13 | 14 |
| 15 | 16 | 17 | 18 | 19 | 20 | 21 |
| 22 | 23 | 24 | 25 | 26 | 27 | 28 |
| 29 | 30 | |||||




So beautiful and so sweet!!! Thank yoy very much for sharing with us! Have a nice day!
Thank you for your sweet message, Gladys! You are so very welcome, and I hope you have a wonderful day as well! ?
Thank you very much for the Raccoon pattern. I have been looking for one for some time now. Can’t wait to get started on it. You did a great job making the pattern.
Thank you so much, Peggy! I’d love to see what you make!
gracias por competir los moldes , desde Colombia
¡De nada! Colombia es un lugar hermoso! ¡Uno de mis buenos amigos vive en Medellín!
This is so cute. Making this for my little man!
I’m so glad you like it, Cathi! I hope your little one enjoys it!
THANK YOU THANK YOU THANK YOU!!!!!!!
This is amazing!!!! I will give you ALLLL the credit!!!
This was EXACTLY what I was looking for!!!!
Thank you for giving the patterns free!!! I will do what I can to share your company’s name and your expertise!!!
I look forward to following you and your creations and would like to support you in any way I can!
Thank you again!
Aww, thank you so much, Macie! I’m so happy you’re excited about the patterns. I hope you enjoy making your raccoon!
Those are so cute! Unfortunately I can’t seem to access the free pattern. Every time I click on “Get the pattern” it leads me back to the start of the “Free Sewing Pattern” page. What do I do wrong?
Hi, Janine! It’s possible your internet browser is redirecting you to the same page. I’m not sure why this happens with certain browsers, but opening the page in a different browser seems to have solved the issue for others who have experienced the same problem. Let me know if trying a new browser doesn’t solve the issue.
Hi, thank you sharing the pattern! I don’t have a sewing machine so will be sewing this by hand.
Would you recommend I stick with fleece? Or felt would be easier to sew?
Thank you!
Hi, Julie! It’s really up to you. I’m partial to fleece. I use a back stitch when I hand stitch with it, and I make sure to make smaller stitches on detailed curves. I know most people prefer felt for hand stitching, so I think it’s really just a matter of preference.
Thanks for your answer. I finally managed to open the link on my phone. The little raccoon is already growing ?.
I’m glad you were able to get it to work! I hope you’re enjoying your little raccoon!
OBRIGADA PELOS MOLDES, EU QUERO FAZER PARA MEU BEBE E COMO LEMBRANCINHA PARA O ANIVERSARIO DELA. SEU BICHINHOS SÃO LINDOS E VÃO DAR UM TOQUE DELICADO NA FESTA DELA.
Thanks, Elis! I hope you enjoy the patterns!
Oh so cute! I’ve got to make one for my daughter. We raised an abandoned baby raccoon last year for about 6 months. She was 4 weeks old when we found her and so cute. We released her late October and didn’t see her all winter, but fully expect her to make an appearance this spring.
That is so sweet! I hope your little raccoon friend comes to visit! ❤️
T H A N K – Y O U
i love this idea and i’m gonna make one for my little sis
You’re so welcome! I’m sure your sister will love it! ❤️
Vivo en Medellín
While my brother Steve was recuperating from a tragic accident years ago, someone brought him some baby raccoons that had lost their mother. He raised these raccoons and they helped him recuperate. From that day on, he saved many motherless raccoons and they also saved him. Mary from Danni Nicole’s, made these raccoons from his clothing for us to remember him.
What a sweet way to remember him! It sounds like Steve was a wonderful person to know!
While my brother Steve was recuperating from a tragic accident years ago, someone brought him some baby raccoons that had lost their mother. He raised these raccoons and they helped him recuperate. From that day on, he saved many motherless raccoons and they also saved him. Mary from Danni Nicole’s, made these raccoons from his clothing for us to remember him.
Thanks a bunch for the pattern! I just made my wife a new raccoon. She has been sleeping with one in her arms since she was a child, and her newest one has finally gotten so threadbare that it was time!
I’m having trouble with the tail Where is the pattern? (if its in plane sight Please don’t laugh, I have ADD)
Sorry for the late reply. The tail should be with the other pattern pieces. Is it possible your printer missed a page?
Thank you for the lovely pattern!
Thank you! You’re so welcome!