Booper the Cat Free Sewing Pattern Plus Bonus Tiny Patterns!
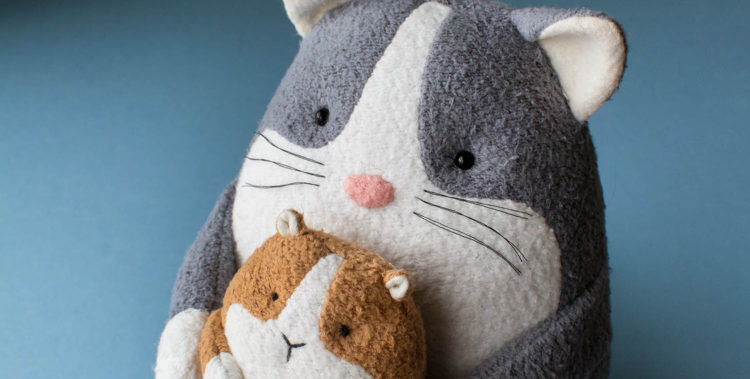
On March 7, 2018 by fluffmongerI’m excited to release my newest free pattern for Booper the Cat and her pet guinea pig, Potato! Since releasing the pattern and tutorial for Quigley the Corgi, I’ve received a few requests for a cat sewing pattern as well as patterns for other common pets. It generally takes a few weeks, if not months, for me to make a single pattern. So instead of starting from scratch, I decided to modify the corgi pattern to release a cat pattern quickly. If you’ve already sewn Quigley the Corgi, you’ll be able to breeze through this tutorial! I’ve also made bonus patterns and kits for a tiny Booper the Cat, a full-size Potato the Guinea Pig, and a tiny Quigley the Corgi!
Materials
To make Booper the Cat and Potato the Guinea Pig, you’ll need:
-
- Main color fleece for cat (I’m using hand-dyed organic cotton and hemp fleece for which I have kits here) You’ll need approximately 1/3 yard (see cutting layout below for closer approximations)
- White fleece — You’ll need approximately 1/3 yard
- Scraps of fleece for tiny guinea pig (or other tiny animal or heart)
- Scrap of lightweight knit fabric for insides of tiny guinea pig’s ears (fleece is too thick to fold in the tiny ears)
- Black embroidery floss/yarn OR Black felt for nose and eyes
- Stuffing (I’m using organic carded wool from a local farm, but I also like this organic roving
*. You can also use fiber stuffing, like this one made from recycled plastic bottles
*)
- Matching all-purpose thread (I carry organic thread in my Etsy shop)
- Marking tool (like this disappearing pen* or this water soluble pen*)
- Scissors
- Pins or clips*
- Tool for turning and stuffing (like these hemostat clamps*)
- Doll Needle
Links with an asterisk (*) are affiliate links. If you make a purchase through one of them, I get a small percentage of the sale with no extra cost to you.
If you use natural fleece, I recommend a 90/14 ball point needle. If you decide to go with organic cotton thread, I recommend making your final stitch a stretch stitch (baste first when sewing curves as a stretch stitch is fairly permanent).
Printing the Patterns
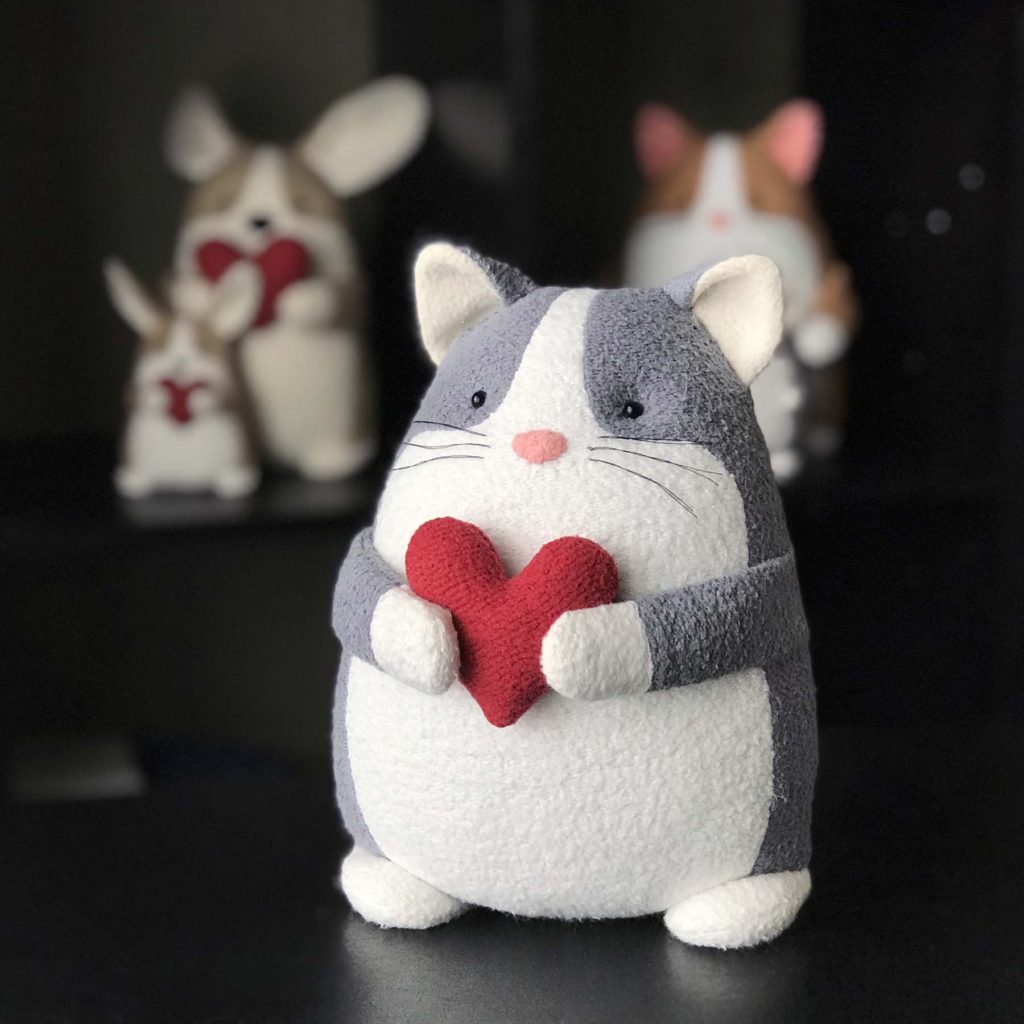
I’ve made two versions of the patterns for Booper the Cat, Potato the Guinea Pig, and Quigley the Corgi, so you can make a big or tiny version, or both!
Print at 100% (see a tutorial on printing and assembling patterns here).
Tracing the Pattern
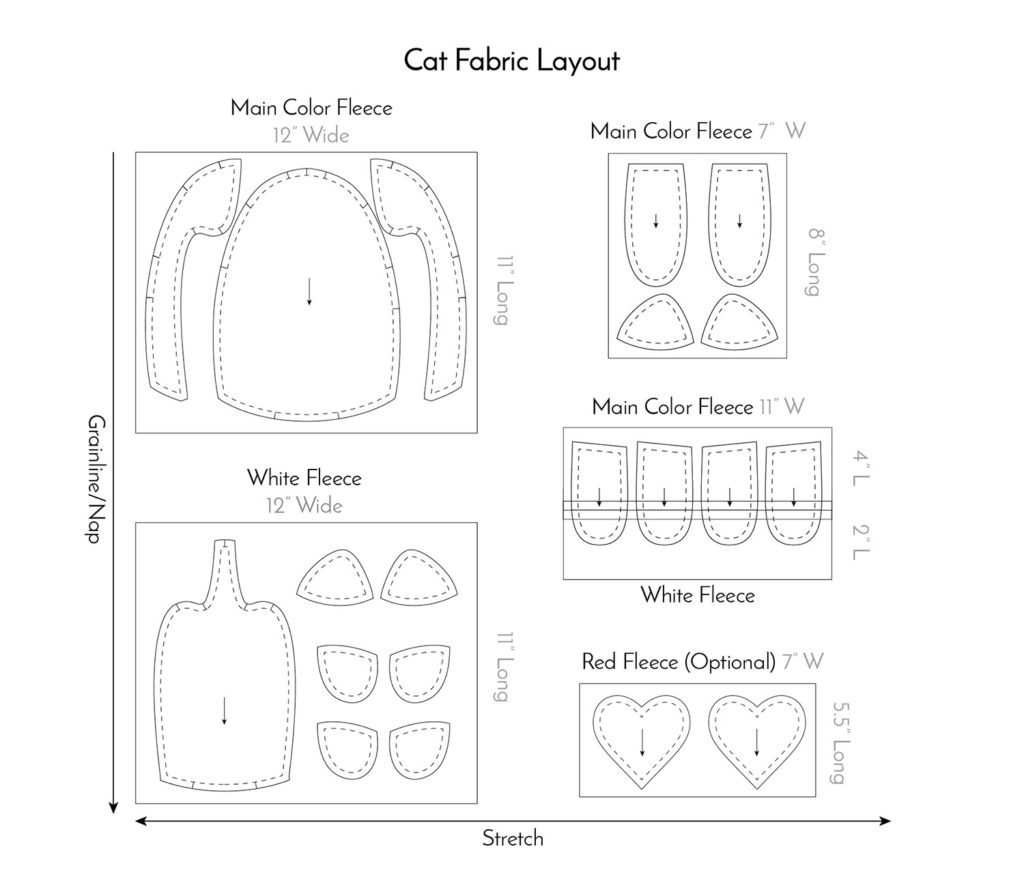
- Cut out paper pattern. I find it easier to trace the stitch line for small pieces, so I’m using the arm, leg, ear, and tail pattern pieces with only the seam allowance at the very end.
- Line up arrows with grainline/nap direction of fabric. Trace all pieces (except the arms) and transfer all markings.
Don’t like sewing curves? Not a problem. Make a solid colored cat by tracing the back piece twice instead of the belly and front side pieces, then transfer the facial markings to one of the back pieces.
Sewing the Arms and Legs
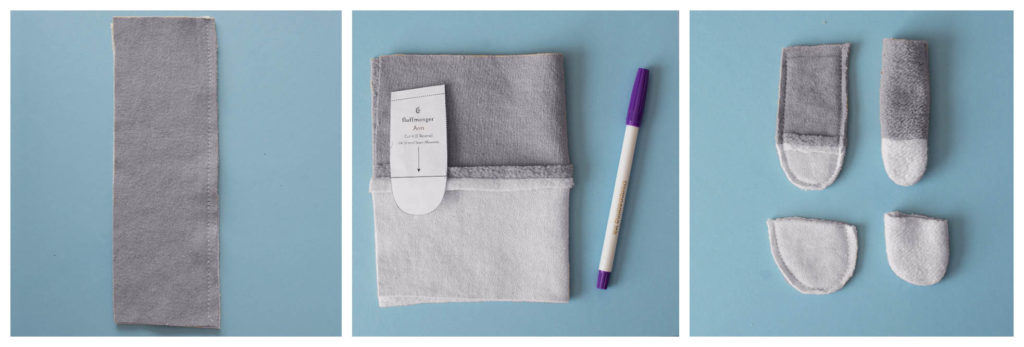
- For the arms, stitch an 11 in x 4 in piece of gray fleece to an 11 in x 2 in piece of white fleece, RIGHT sides together, along the longest edge.
- Finger press seam allowance open, fold widthwise with RIGHT sides together. Trace pattern piece and stitch arms.
- Cut out arms and turn. Run your hemostat clamps around the seams inside to help them fully open, and stuff about 2/3 of the way up.
- With right sides together, stitch around legs. Cut out and turn right side out. Stuff 2/3 full.
Sewing the Body Front
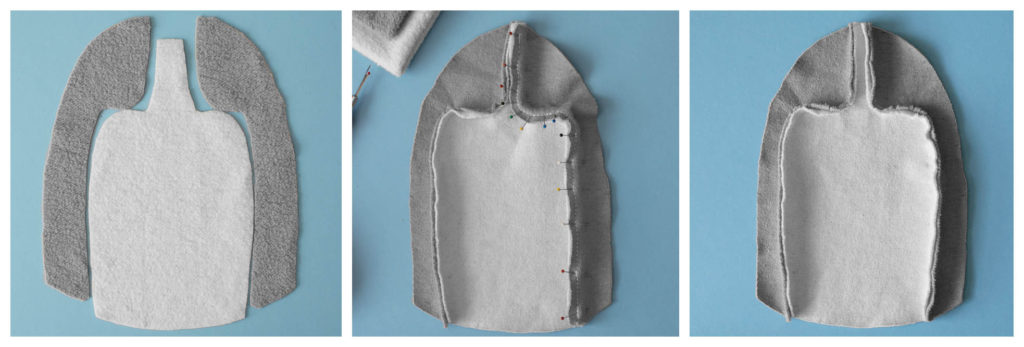
- Cut out body pieces. Again, if you want a solid color cat, substitute the front pieces for a second back piece.
- Pin pieces 1 and 2, RIGHT sides together. Sew with 1/4″ seam allowance. If you are new to sewing curves, baste stitch and make sure you don’t have any puckering before sewing the final stitch. (See a video on sewing curves here.)
- Repeat for the other side.
Sewing the Ears
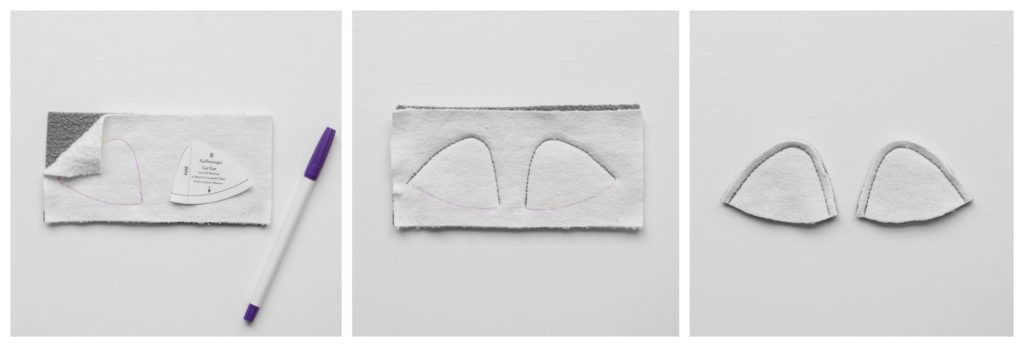
- Trace stitch line of ears.
- With right sides of fabric together, stitch around ears.
- Cut out ears.
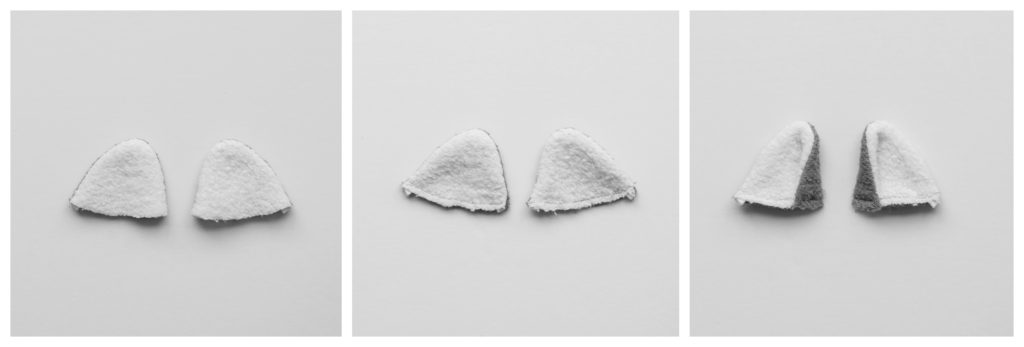
- Turn ears right side out. Run your hemostat clamps around the seams. Press if needed.
- Baste stitch ears 1/8″ from bottom edge.
- Fold inner edge of ears over at indicated marking. Baste stitch again across the bottom to hold ears in folded position.
Assembling the Body
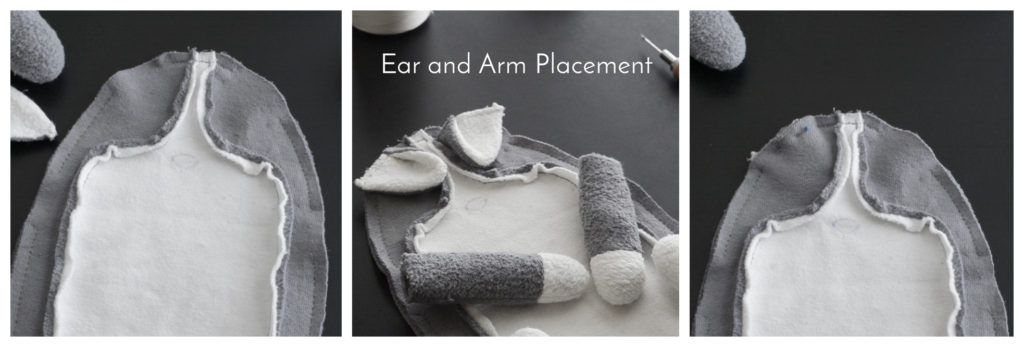
- Stitch body pieces RIGHT sides together around U shape, leaving the openings for ears and arms.
- Place the ears and arms in position (photo shows direction ears and arms should be in before being inserted inside the body). Make sure the insides of the ears are touching the body side with the face, and make sure the folded edges of ears are facing the center.
- Pin ears and arms then stitch in place.
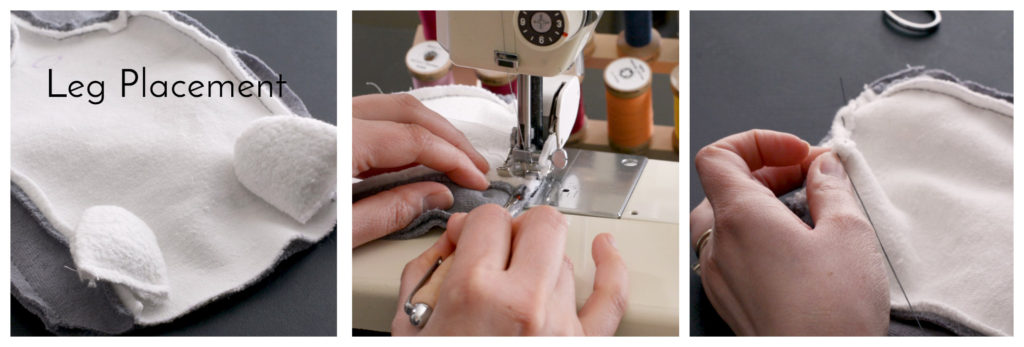
- Position legs with the longer side of leg touching the outer seam on body (photo shows direction legs should be in before being inserted inside the body).
- Stitch in place, taking care not to stitch beyond the width of the leg (otherwise your hole for turning will be narrow).
- Hand baste the seam allowances of the opening on the bottom of the body. Clip corners.
Make sure you have your eye and nose positions marked on the right side of the fabric. At this point, you can make the eyes and nose, or you can wait until after stuffing. I like to wait until then end so I can needle sculpt the eyes.
There are a number of options for the eyes and nose:
- You can make them with felt and machine or hand-stitch them 1/8″ from edge, like I did in the Doodles the Deer tutorial.
- You can use a satin stitch for the nose and make embroidered knot eyes with embroidery floss or yarn (here’s a video tutorial on embroidering eyes with a French or colonial knot).
- You can use glass eyes if your cat is not intended for a small child. (I have a tutorial for here for using glass beads for eyes.)
- You can use a plastic safety nose and eyes. Note that safety eyes/noses are not intended for small children, and I do not recommend using them with natural-fiber fabrics, like organic fleece. (Safety eyes typically require a small amount of fusible stabilizer or Fray Check to prevent holes in stretch fabrics.)
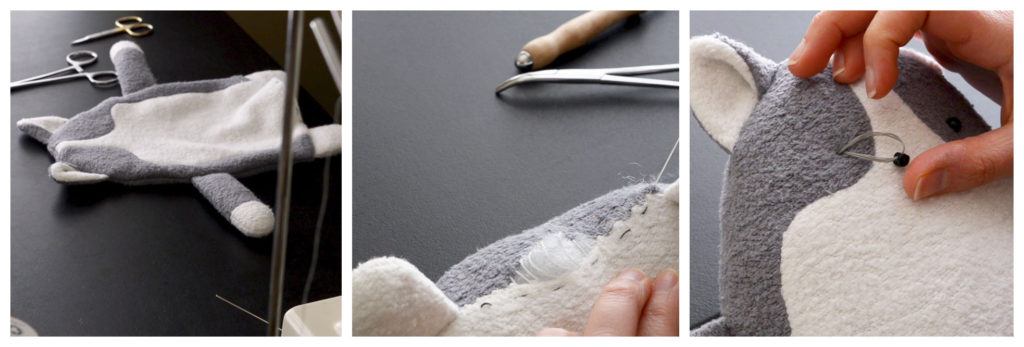
- Flip the body right side out. Run your hemostat clamps or chopstick along the inside seams. Stuff the body. Take extra care to stuff the corners of the bottom and the area around the opening.
- Close with a ladder stitch (here’s a video tutorial on how to ladder stitch).
- If you haven’t already, make the eyes and nose. If you’d like to needle sculpt your eyes, here’s a video tutorial.
The Tail
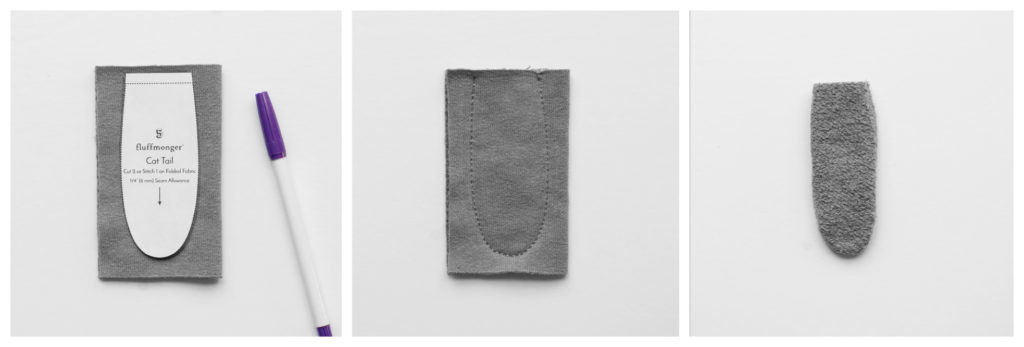
- Trace stitch line of tail.
- With right sides of fabric together, stitch around tail.
- Cut out and flip right side out.
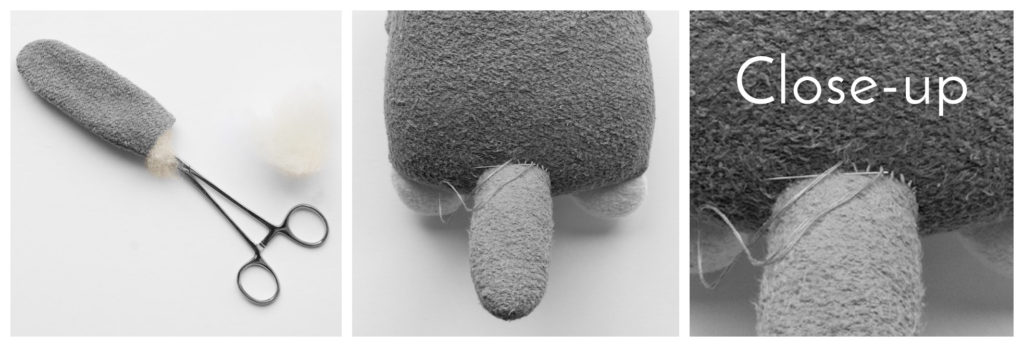
- Stuff tail to end and fold seam allowance in.
- Ladder stitch tail to indicated area on back. Secure a knot and bury the thread tails. (Here’s a video on attaching parts with a ladder stitch.)
Making the Whiskers
You can use any color you like for the whiskers. I actually prefer the look of white thread, but I had to make the whiskers black to be visible in the photos and video. There are a number of ways to attach whiskers, but this is the method that works best for me:
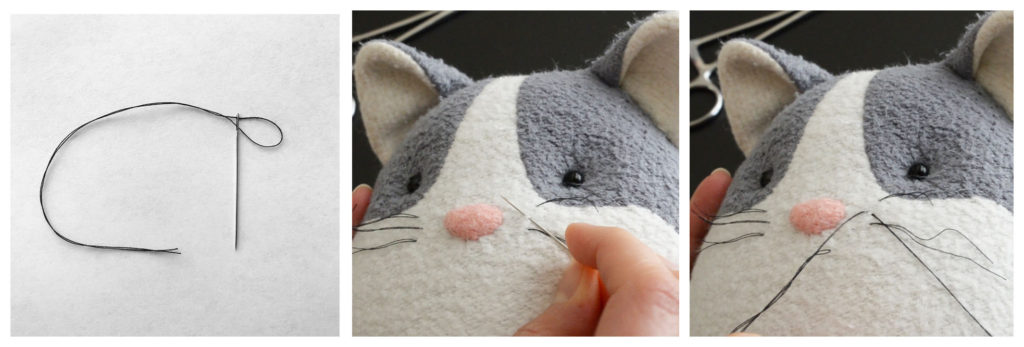
- Take a strand of thread 8-10″ long and fold it in half. Thread folded end of thread through the eye of a needle (do NOT tie a knot).
- Insert needle into one of the whisker points, grab a few threads from the fabric, and bring the needle out.
- Hold the thread tails and pull the needle until the looped end of the thread is pulled out of the fabric and the needle comes off. Put the two tails of the thread inside the looped end and pull taut to make a knot. Repeat for other whiskers and trim threads to desired length.
Sewing Tiny Patterns
The tiny versions can be sewn entirely by hand, or they can be sewn using a combination of machine-stitching and hand-stitching. The small versions are made using the same instructions as the large versions with a few exceptions:
- Stitch the curves by hand or at least baste by hand before stitching on the machine.
- Use only embroidery for the eyes and nose. Appliqué is too difficult at this this scale.
- For the insides of the ears on tiny animals, I recommend using a lighter weight fabric than fleece so the ears can fold over. I used jersey knit fabric for the inner ears on my tiny cat, corgi, and guinea pig.
- If making a tiny Potato the Guinea Pig, you will fold in both sides of the ears instead of just one side.
- If making a tiny corgi, you do not need the optional third layer of fabric for the ears mentioned in the corgi tutorial.
Finishing Up
If you’d like to attach a tiny animal or heart to Booper the Cat’s paws, you can use a ladder stitch or another stitch you are comfortable with. If you have a 5″ doll needle, you may find it helpful to run a thread through the guinea pig that attaches to both paws before doing a ladder stitch. To do this, secure a knot inside one of the cats paws, insert the needle into one side of the guinea pig and bring it out the other, grab about 1/4″ of fabric on the cat’s other paw, pull the tread tight, and secure a knot. Then you can ladder stitch around the knots made on the paws if desired.
Pattern Testers
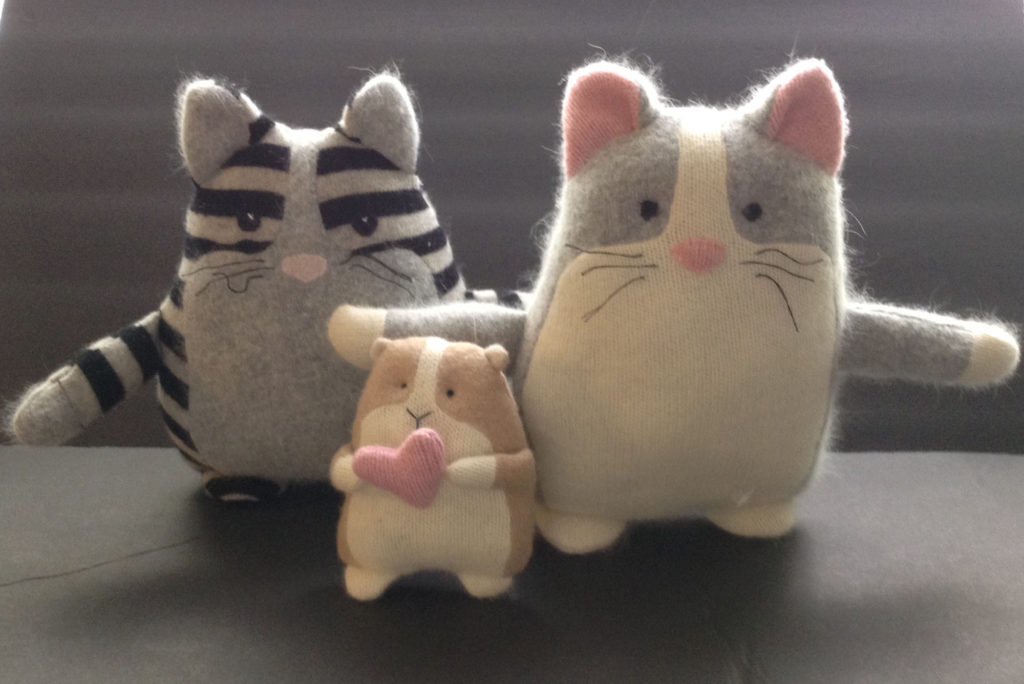 Anna Murfin tested my patterns with some upcycled sweaters! I love the texture the sweaters gave her animals, and I want to steal her guinea pig!
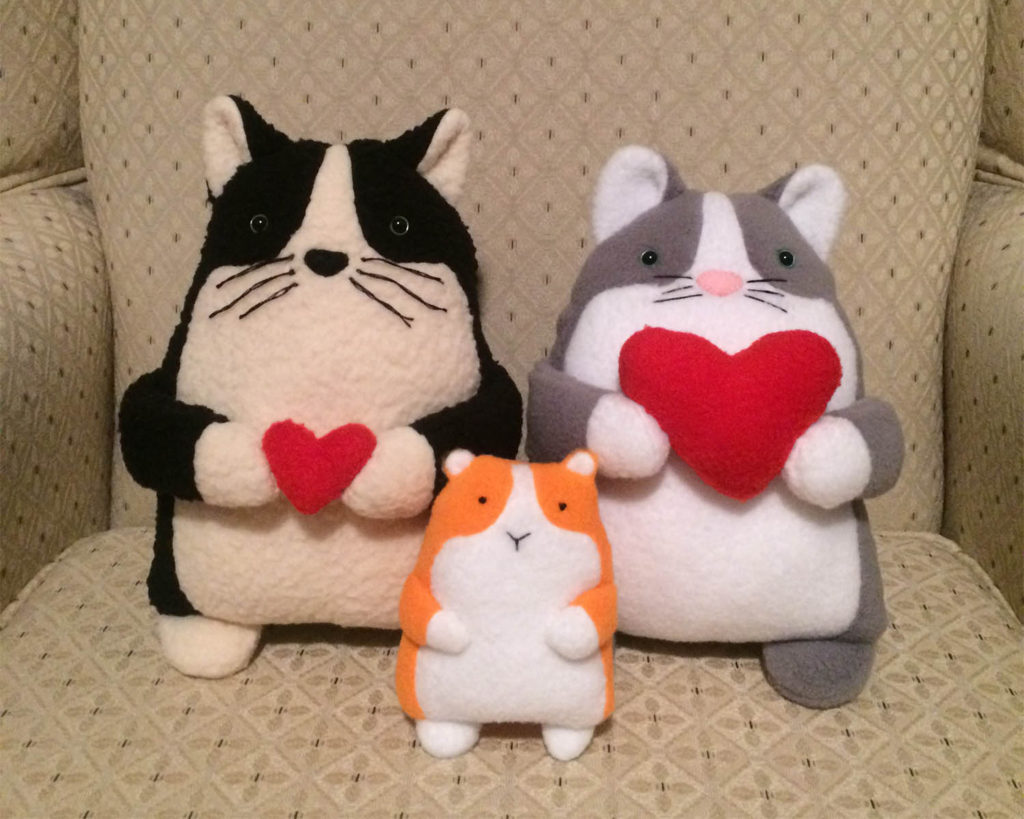
Veronica Stienburg made these little guys with polyester fleece! Is that bright orange guinea pig not adorable?!
I’d love to see what you make! Share your photos in my Fluffmonger Patterns group on Facebook!
Organic Fabric Kits
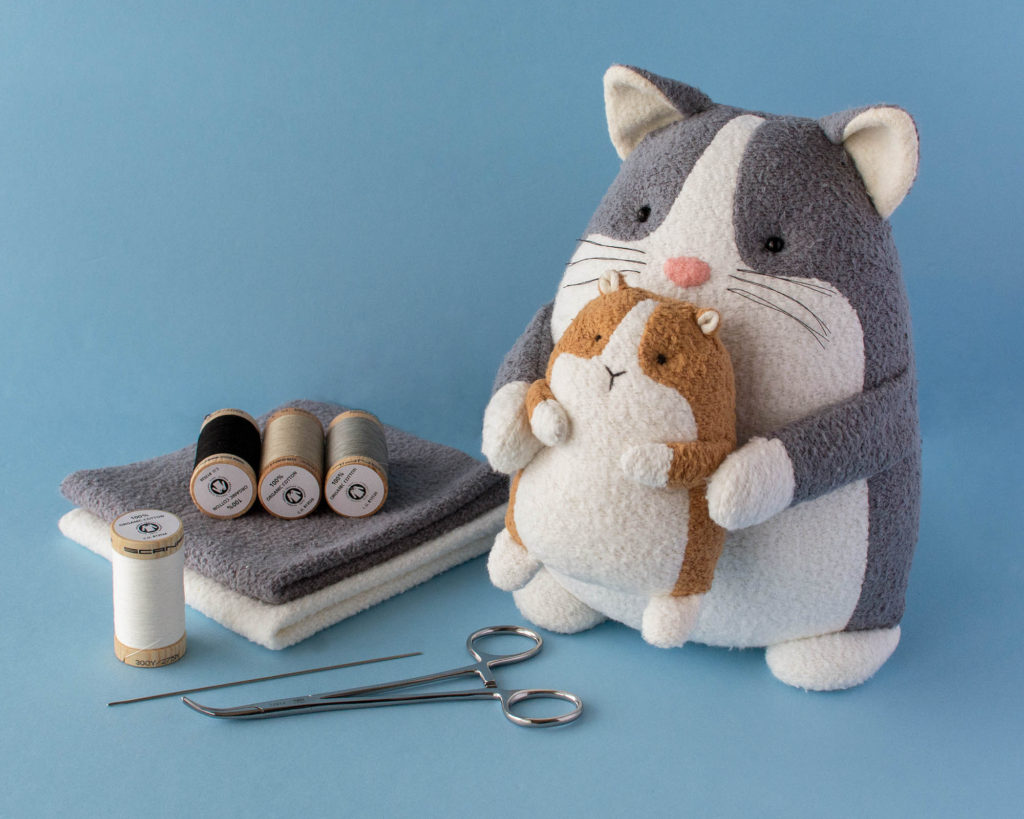
If you’d like to try sewing any of the patterns in this tutorial with organic fabric, I have fabric kits available with just the right amount of hand-dyed organic fabric to complete the project. I also have deluxe kits that include fabric, thread, and tools.
Selling Items Made with this Pattern or Creating Derivative Works
This pattern may be used to create handmade toys to sell, but items may not be mass-produced. Please give credit to Fluffmonger with “pattern by Fluffmonger” and a link to my website, www.fluffmonger.com on your tags and listings.
If you modify the pattern or use certain pieces to create another pattern, still credit Fluffmonger, as these are considered derivative works.
This design is protected by federal copyright law (© 2018) and may not be reproduced in any form. Reproduction of this design, either in part or whole, or distribution of this pattern electronically or by hard copy is strictly prohibited.
63 comments
Leave a Reply Cancel reply
Archives
- March 2021
- February 2021
- April 2020
- January 2020
- November 2018
- July 2018
- April 2018
- March 2018
- February 2018
- January 2018
- December 2017
- November 2017
- October 2017
- March 2017
- February 2017
- November 2016
- October 2016
- September 2016
- August 2016
- July 2016
- June 2016
- March 2016
- February 2016
- January 2016
- December 2015
- November 2015
Calendar
| S | M | T | W | T | F | S |
|---|---|---|---|---|---|---|
| 1 | 2 | 3 | ||||
| 4 | 5 | 6 | 7 | 8 | 9 | 10 |
| 11 | 12 | 13 | 14 | 15 | 16 | 17 |
| 18 | 19 | 20 | 21 | 22 | 23 | 24 |
| 25 | 26 | 27 | 28 | 29 | 30 | 31 |




Thank you very much for the new pattern! I love your designs! A hug from Argentina!
You’re so welcome, Gladys!❤️❤️❤️
So cute! Thanks for sharing.
Thanks, Elaine! You’re so welcome!
Thank you for sharing these darling patterns. Your generosity is greatly appreciated.
You’re so welcome, Shelley! I’m glad you’re enjoying them!
What a cute pattern! Thank you so much!
Thank you so much, Jacqueline! You’re welcome :).
I LOVE LOVE LOVE everything you design! One day I will have an office full of fluffmonger designs! Your work is amazing and I am over the moon that you shared this new pattern with us! ❤️ You have a true gift! Thank you!!
Aww, thank you so much, Angela! Messages like yours are what make me want to keep making more patterns :). I’m so happy you are enjoying them!
Thanks so much, Booper is fabulous, I’m a big cat fan, unfortunately I can’t seem to access the other patterns that go with him?what am I doing wrong?
Thank you so much, Anita! When you signed up to get the patterns, you should have received a zip file with all 5 patterns. The zip file may look like one file until you open it. I’ll email them to you directly just in case.
I’m having a problem with the zip file. Usually I can open these as adobe (because I don’t have the program to “unzip” files) but this one is giving my computer fits. But they are super cute. Are the pictures in the fabric lay-out the actual pattern pieces? Maybe I can do something with that.
I’m glad your 14-year-old was able to figure it out for you! Hope you enjoy the patterns!
So, quick update…my 14 year old fixed it for me.
I signed up to get Booper but never got a link. Is there any way someone can tell me what went wrong?
I’m sorry about that, Bev. I will email you the patterns directly.It may have gone to your spam folder, or, if you use an email service that divides your inbox into different folders, it could be in a “promotions” or “updates” folder.
Thank you very much for sharing this pattern, so generous of you. Perfect for my cute animals lovers !
You’re so welcome, Sevrille! Hope you enjoy the patterns!
Can’t wait to make your fluffies! I received the Corgi but not the cat can I rectify this? I bet Queen Elizabeth would love the Corgi for sure!!!!!
So, so sorry. Corgi was in the In Box, Cat was in the Junk Box. How dare they! The Fluffies are not Junk!
Received them all in good health. So excited to get started for the Easter Baskets. Susie
Glad you received them all, SusanAnn! That’s odd they they went to different boxes. Have fun with your Easter sewing!
I signed up to get the pattern last week, but didn’t receive anything. I tried again today on a different computer and I’m still not getting any emails from you. (I checked the junk folder and it is empty.) I don’t understand why–I’ve received emails through MailChimp before.
Yay, it came through. I added your addy to the safe list and it arrived immediately afterwards. Thanks so much for the pattern. Adorable!
I’m glad it came through! Hope you enjoy the pattern!
After I initially commented I appear to have clicked the -Notify me when new
comments are added- checkbox and now each time a
comment is added I receive four emails with the same comment.
There has to be a way you can remove me from that service?
Thanks!
Hi, Michelle. I’ve searched through all of my comments and did not see any comments from you other than this one. Unfortunately, I do not have control over your email settings for comments on wordpress. You should be able to adjust your notification settings via a link within the emails wordpress is sending you.
Thank you so much for sharing I have a 7 year old son he loves plushie toys. A while ago he told me “there is no age to play with with plushie toys!” I am sure he will love yours! Regards from Argentina!
You’re so welcome, Rosana! You’re son is absolutely right! If they bring you joy, they’re meant for you, regardless of age ;).
I love them all! But cats have a special place in my heart…
Thank you so much, Loreto! I’m torn between cats and dogs. I currently have only one cat (who will not allow me to have another pet), so I guess I’m a cat person at the moment ;).
The links that are supposed to lead to the downloads on this site don’t work. Very disappointed to find a 404 error instead of the cat pattern and the corgi pattern is the same.
I’m sorry you had that experience, LadyD. There may have been an issue with my server when you tried to download the patterns. The links appear to be working at the moment. I’m happy to email you the patterns directly if you continue to have issues downloading them.
These are so adorable! Thank you so much for sharing them! I have two young grandchildren that would love them to bits! I have a question about noses, though – did you color a tiny bit of the white with something? Is the nose ladder stitched on?
You’re so welcome, Momo G! There are a number of ways to do the noses on the full-size animals. You can use a satin stitch, applique a piece of felt by hand or machine, or use a pre-made nose like a safety nose. For the tiny animals, you will want to stick to using a satin stitch since they’re so small. Hope that helps!
This is, by far, the best filmed tutorial I’ve ever seen! Plus the fact that the kitty and hamster are darling, thank you for the sweet pattern!
Thank you so much, Elsa! That made my day :). I hope you enjoy the patterns!
Thank you. These are just adorable!
Thank you, Elizabeth! you’re so welcome!
Gracias por compartir. Son unas ternuritas. Me encantaron.
De nada, Ingrid! Espero que los disfrutes!
I cannot believe you are sharing these adorable gifts to us and that is just what they are, gifts. No charge means a gift. My fingers are itching to get started on all of them and I have three children that will adore them all. Thank you, thank you, thank you. Blessings to you for your kindness.
Thank you so much for your sweet comment, SusanAnn!Comments like yours make me want to keep creating more free patterns!I hope you enjoy them, and I’d love to see what you make!
Thank you so much for these patterns. All of them are adorable but I am a cat person and can hardly wait to get one made. You are the best, bless you!
Aww, thank you so much, Dee! I love hearing when people are excited about my patterns! I hope you enjoy them, and I’d love to see what you make if you want to share!
slm
tank you
they are very very good
Thank you, Reihaneh! You are very welcome!
Where is the tiny cat pattern? Thanks so much for offering these patterns online free of charge. I’m making gifts for our grandchildren!
I love this pattern! You made it so simple and easy, especially for beginners! I am actually a 12 year old, and I was looking to find an easy, free pattern to sew a present for my little cousin! Thank you so much for letting us use your patterns!
You’re so welcome, Clara! That’s so sweet of you to make a present for your cousin! I hope you enjoy continuing to learn to sew!
thank you much for sharing these beautiful cute animal patterns. they look fantastic!!!!