**Update 11/23/18: This pattern and tutorial has been updated. If you want the new Doodles the Deer pattern that goes with the fabric kits and that is the same size as the other free patterns, see the new tutorial here.
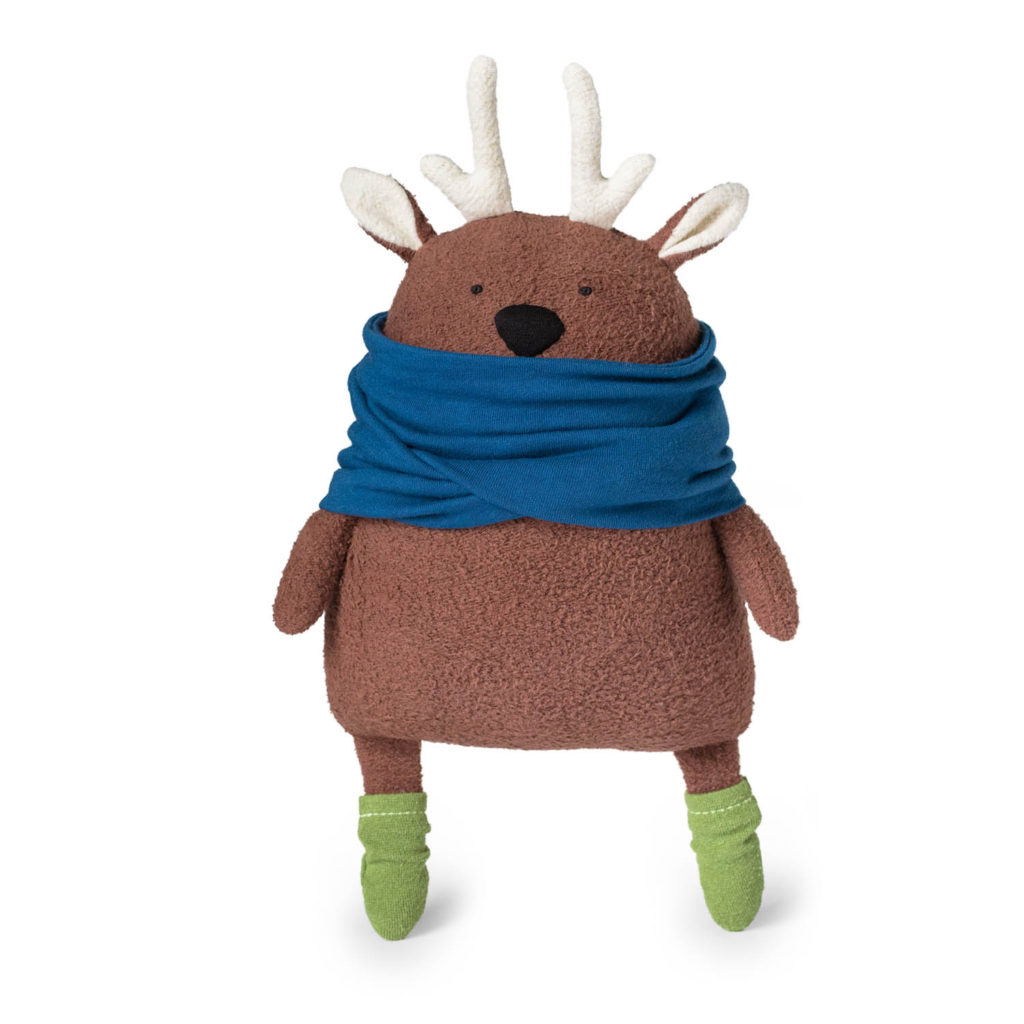
Despite being a little tubby, Doodles the Deer requires cozy accessories to stay warm during the winter. Doodles will make the perfect gift for a child, or anyone who appreciates plump, cuddly animals! Doodles can be made from new fabric or, for an eco-friendly plush toy, upcycled clothing or eco-friendly felt or fleece. I’ve made a video tutorial (this is the extended version, not the one from social media) as well as a step-by-step photo tutorial below for making Doodles.

The deer in the video tutorial was made with Kunin felt made from recycled plastic bottles, a misprinted shirt I salvaged from a local screen printer, a ripped pair of flannel pajamas, and a scrap of organic cotton fleece. I also made a Doodles with all organic knit fabrics (pictured below). You can see how the difference between the non-stretch plush felt and the stretchy organic fleece makes for an even fatter deer!
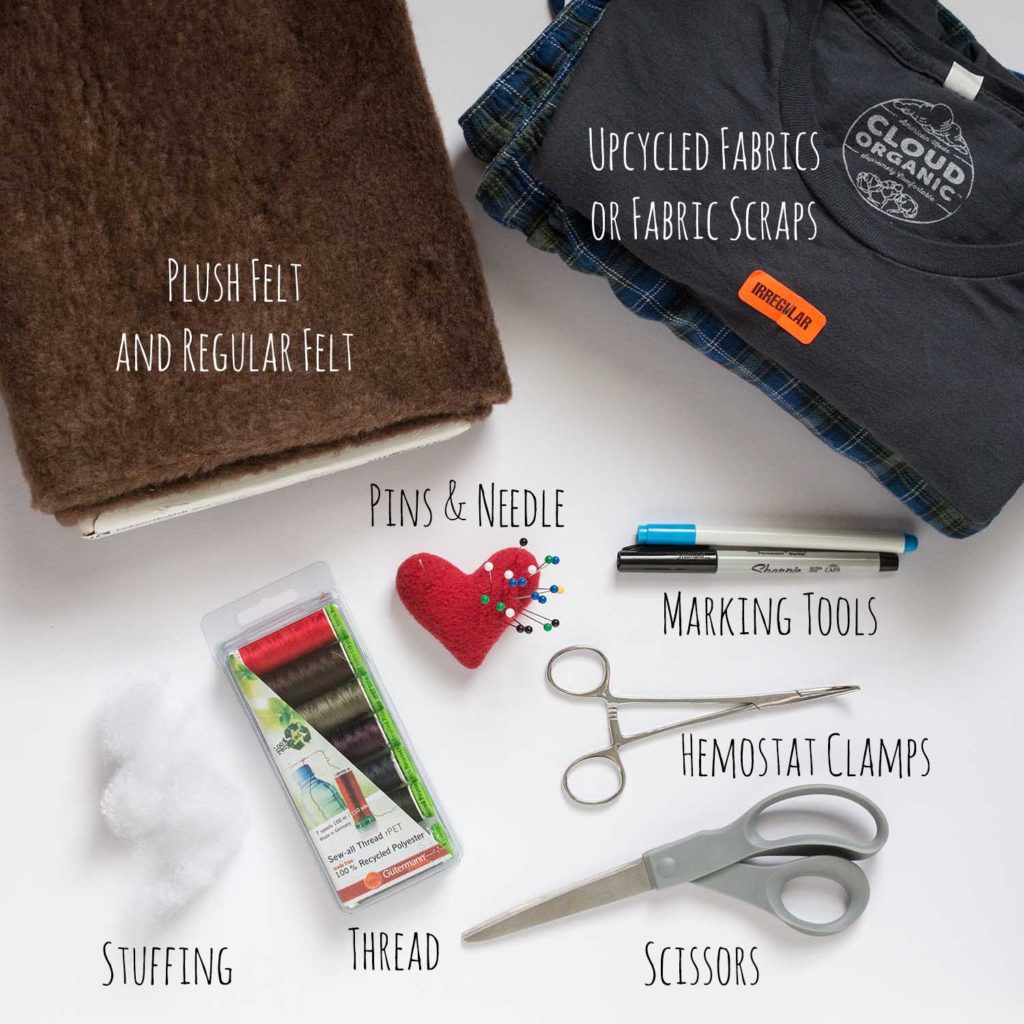
To make Doodles, you’ll need:
-
- Either 1/2 yard plush felt, upcycled fabric, or fleece for deer body (for the deer in the main image, I used Kunin Eco-fi Plush Felt in vanilla
and chocolate
*)
- 1/3 yard upcycled stretch or woven fabric for scarf (at least 10-in x 39.5-in)
- 1 sheet of black felt or black embroidery floss for nose and eyes (I’m using Kunin Eco-Fi Felt
*)
- 1 sheet of off-white felt or fabric scraps for antlers and insides of ears
- Stuffing (I’m using Fairfield Poly-Fil
*, which is made from recycled plastic bottles)
- Matching all-purpose thread (I carry organic thread in my Etsy shop)
- Marking tool (like this disappearing pen* or this water soluble pen*)
- Scissors
- Pins or clips*
- Tool for turning and stuffing (like these hemostat clamps*)
- Either 1/2 yard plush felt, upcycled fabric, or fleece for deer body (for the deer in the main image, I used Kunin Eco-fi Plush Felt in vanilla
*These are affiliate links. I was not given any of the products used for this tutorial for free. I purchased them with my own money. If you make a purchase through one of my links with an asterisk (*), I get a small percentage of the sale. It’s not much, but it helps me keep making fun tutorials like this one!
Testing Upcycled Fabrics
This pattern can be sewn with stretch or woven fabric, just don’t mix and match knits with wovens unless you know what you’re doing. There’s nothing more frustrating than having a sewing project turn out poorly because your chosen fabrics are a nightmare to work with. I recommend sewing with fabrics you have some experience with. If you want to use upcycled fabric for the deer body, I recommend using old cotton or cotton/poly hoodies/sweatpants or a woven fabric that isn’t too heavy or frays easily. For the socks, you want to use a medium weight stretch fabric (nothing too thin or overly stretchy like some t-shirts can be). Test a small pattern piece with any upcycled fabrics you are using. You want to ensure the needle does not leave holes on knits (with certain knit fabrics, you may need to use a ballpoint or stretch sewing needle and reinforce your straight stitch with a stretch stitch). With woven fabrics, you want to make sure the fabric does not fray up to stitchline when turned and stuffed. You may need to add additional seam allowance with some woven fabrics. Unfortunately, I can’t be there with you to help you select your fabrics. If you’re relatively new to sewing, I’d recommend using the same fabrics I did for the tutorial.
Printing, Assembling, and Tracing the Pattern

**Update 11/23/18: This pattern and tutorial has been updated. If you want the new Doodles the Deer pattern that goes with the fabric kits and that is the same size as the other free patterns, see the new tutorial here.
Get the old version of the pattern
Print at 100% (see a tutorial on printing and assembling patterns here).
Line up arrows on pattern pieces with grainline/nap direction of fabric. Trace all pieces and transfer all markings. Note that the body and sock pieces have a 1/4″ seam allowance. It is easiest to trace the stitchline for the ears, legs, arms, and antlers, so those pattern pieces do not have a seam allowance added. If making the nose and eyes with felt, I recommend taping the pattern pieces directly to the felt and cutting them out (watch this video for a detailed tutorial).
Making the Deer

Cut out body pieces. Stitch arms, legs, ears and antlers on folded fabric. Cut out, clip curves, and turn right side out.
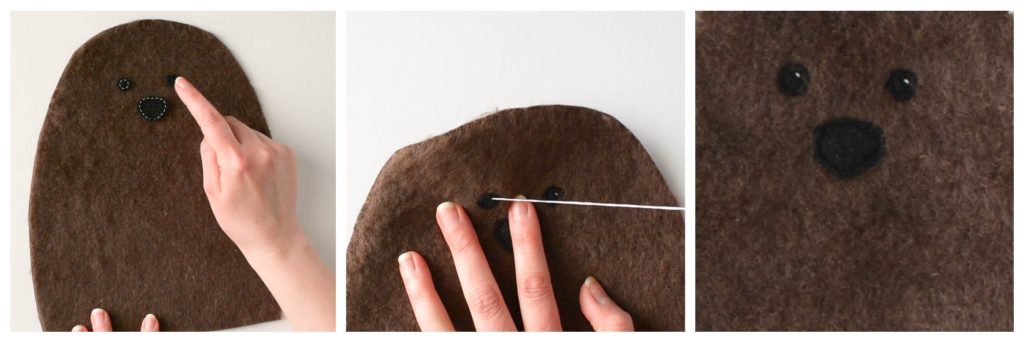
Machine stitch or hand-stitch around nose 1/8″ from edge.
For the eyes, you can do the same, or you can use a satin stitch, safety eyes, or embroidered knot eyes like I used for the organic deer (here’s a video tutorial on embroidering eyes with a French or colonial knot).
For an added touch to felt eyes, you can embroider a single stitch with white thread or floss in both eyes.

Cut out socks. Fold 1/2″ hem at top of sock and press. Topstitch across sock hem 1/4″ from fold with a stretch stitch or narrow zig zag stitch. Lay sock pieces RIGHT sides together and stitch around U shape with a stretch or zig zag stitch. Trim seam allowance and turn right side out. Put socks on legs.

Stuff antlers. Stuff all the way to the ends to help hold the antlers upright. Stuff arms and legs about 2/3 of the way up.
Baste stitch ears 1/8″ from bottom edge. Fold in sides of ears to meet in middle. Baste stitch again across the bottom to hold in folded position.
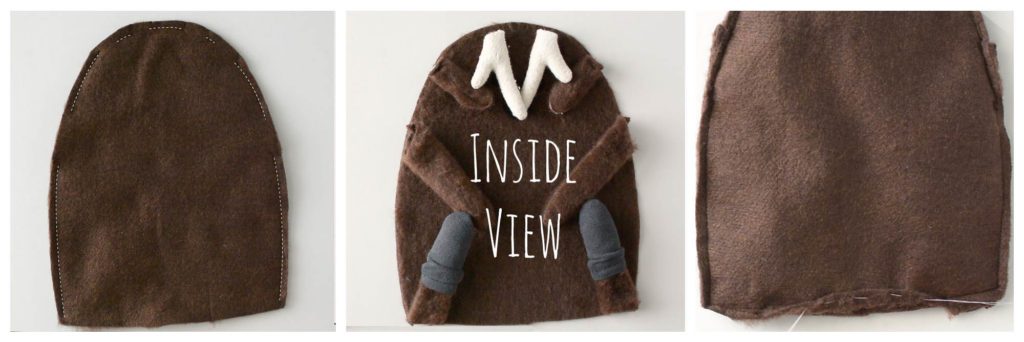
Stitch body pieces RIGHT sides together around U shape, leaving the openings for arms, ears, and antlers.
Place the arms ears and antlers in position. (Make sure the inside of the ears are touching the body side with the face.) Stitch arms, ears, and antlers in place.
Position legs with the longer side of leg touching the outer seam on body. Stitch in place.
Hand baste the seam allowances of the opening on the bottom of the body. Clip all curves and corners.

Flip the body right side out. Run your hemostat clamps or chopstick along the inside seams to help open them up.
Stuff the body. As you can see in the video, Doodles can hold a lot of stuffing. Take extra care to stuff the corners of his bottom and the area around the opening.
Close with a ladder stitch (here’s a video tutorial on how to ladder stitch).
Making the Scarf
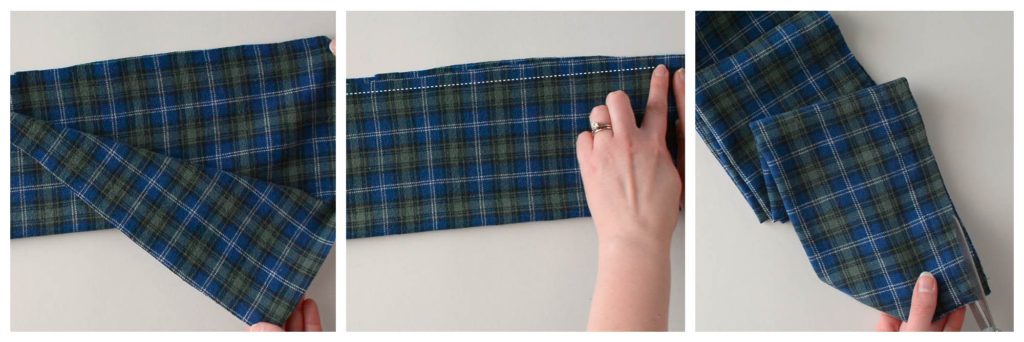
Depending on what fabric you’ve chosen and how well you have stuffed your deer, you may need to make a shorter or longer scarf. The deer I made with the Kunin plush felt were 16″ around the area where the neck meets the body, and the deer I made with organic fleece was 20″ around. I made scarves with a circumference of 38″ after being sewn, and I was able to use them interchangeably between the thinner and fatter deer. You can also make your scarf half the length so that it only goes around the deer’s neck once instead of twice.
Press fabric, fold in half lengthwise with RIGHT sides together. Cut folded fabric to 5″ x 39.5″ (or shorter/longer to fit your deer).
Stitch along the raw edge of the long opening with a 5/8″ seam allowance (if using knits or woven fabrics that fray, stitch with a narrow zig zag stitch).

Reach hand through inside of tube, grab ends of opening and pull through to the other side until the seam allowance of both open ends match up. Stitch around open ends leaving a 3″ opening for turning.
Reach hemostat clamps inside scarf opening and pull scarf right side out. Fold raw edges in and ladder stitch opening closed.
This is a standard infinity scarf, for which there are dozens of awesome tutorials on the internet. If you find the scarf too difficult, you can also just flip the tube right side out, fold scarf in half widthwise, and stitch ends together. The ends won’t look as finished, but they’ll be on the back where they won’t be as noticeable. Doodles won’t mind ?.
To double the infinity scarf over, slide the circular scarf over hands, holding the circle open with the back of your wrists. Twist scarf into a figure 8, and slide one end of the eight into the other. Pull doubled over scarf over your deer’s head and adjust so the tops of the arms are held down by the scarf. (Note: If Doodles is intended for a child, you may consider hand-stitching the socks and the scarf to the deer.)
You’re finished! I’d love to see your Doodles the Deer! You can join my facebook group for people sewing with Fluffmonger patterns or share your photos on social media with #fluffmongerpatterns.
Selling Items Made with this Pattern or Creating Derivative Works
This pattern may be used to create handmade toys to sell, but items may not be mass-produced. Please give credit to Fluffmonger with “pattern by Fluffmonger” and a link to my website, www.fluffmonger.com on your tags and listings.
If you modify the pattern or use certain pieces to create another pattern, still credit Fluffmonger as these are considered derivative works.
This design is protected by federal copyright law (© 2017) and may not be reproduced in any form. Reproduction of this design, either in part or whole, or distribution of this pattern electronically or by hard copy is strictly prohibited.




This is divine! Sooo cute! Thank you x
Reply
Thank you so much! I hope you enjoy sewing your deer!
Reply
I really love it.. Thanks for the tutorial
Reply
You’re so welcome! I’m glad you enjoyed it!
Reply
This is the cutest tubby cuddly deer! Thanks so much for the tutorial and pattern.
I would like to throw in my two cents about using the word eco-friendly regarding any synthetic fabrics. Plastics are never eco-friendly. They are made from the waste of oil processing which is never eco-friendly. It takes as much water and power and creates as much air and water pollution to recycle plastic as it does to make it newly. This process will never be eco-friendly.
I’m not suggesting we shouldn’t recycle; I’m just suggesting we not fool ourselves as to the ecological cost of production of the materials we choose to use.
Beyond the constant misapplication of the term eco-friendly to recycled plastics, the thing that concerns me more is the toxicity potential of these fabrics.
The fibers spun from plastics, including those from recycled plastic bottles, are considered toxic when ingested or inhaled (US Toxic Substances Control Act). They are considered inert until those small fibers are swallowed or breathed in by babies, pets, anyone. We know babies chew on even furry plush toys and have seen the little fibers floating in the air. Dogs tear up pet beds filled with this stuff. I am very concerned about our responsibility as makers and mothers regarding choice of material that end up in the arms of children and hope you and your readers will consider a non-toxic set of tools for making the very items we hope will comfort and inspire children. Protecting them starts with information.
Plastics are next to impossible to avoid and I don’t avoid them entirely myself. I’m not trying to be radical here. I choose to use few plastic fibers, even in my fabric upcycling which is is most of my fabric stash, simply because I dislike the feel and look of them. But I never use them in toys because of my responsibility to the health of the children who may play with them. I hope you will accept this post in the spirit in which it is intended – concern and caring for children and makers.
Reply
Hi, Allison! I’m glad you like the deer pattern!
In the tutorial, I also refer to using upcycled and organic fabrics, which I consider the most eco-friendly options for sewing materials. I recommended Kunin Eco-fi plush as another option in this tutorial because their company has received a number of awards for environmental excellence. Recycled polyester is considered a class A fiber on the environmental benchmark rating system that classifies fibers according to greenhouse gas emmissions, human toxicity, eco-toxicity, and energy and water use. Kunin fabrics are also made entirely in the US (so not in overseas sweatshops). While their fabric may not be as eco-friendly as organic or upcycled fabric, I feel that fabric made from recycled plastic bottles is certainly a step above fabric made from conventional cotton, virgin polyester, and dyes that are often unregulated. The environmental impacts per kilogram of fiber are higher for conventional cotton than polyester due to the amount of pesticides, fertilizers and water required for growing it.
I recommended Fairfield fiberfill also because it is 100% recycled and made in the US. I’d love to only recommend organic and biodegradable stuffing, but they’re unfortunately not viable options for everyone — some people have wool allergies (and organic, humane wool is not accessible to everyone); cotton stuffed toys tend to be very lumpy and will not pass flammability tests; kapok and hemp are not ideal for stuffing; and I do not recommend corn fiber or bamboo because they have their own environmental drawbacks. PLA (corn fiber) is considered a class C fiber. It’s typically made with GMO corn, has been shown to not break down on its own, and can’t be recycled. Bamboo is an excellent eco-friendly material when kept in wood form. But in order for it to be transformed into a soft fiber, a number of toxic chemicals are required to break it down. Organic buckwheat hulls are, by far, my favorite stuffing, and I plan to show how to use them in another tutorial, but they are not ideal for this particular project. I wanted to recommend a stuffing option that would be easy to find and easy to use. In my shop, I offer three stuffing options for people to choose from. 90% of the time, customers choose recycled fiber fill because washability and price are important factors to them.
I certainly understand your concerns about the health-implications of using plastics — really, I do. As someone living with chronic illness, I am keenly aware of the connection between chemicals in everyday products and auto-immune dysfunction. Until there is a more eco-friendly, cost effective, and readily available stuffing choice, however, I’m not left with a lot of options to recommend. Recycled polyester stuffing is the cheapest and most-readily accessible of the stuffing options. I feel strongly that crafting should be affordable and accessible to everyone, so I tried not to use extraordinarily expensive or hard-to-find materials for this tutorial.
I appreciate your feedback. I hope after reading my explanation, you have a better understanding of my material decisions for this tutorial.
Reply
I love your tubby little Doodles. He’s perfect 🙂
Reply
Thank you so much, Trixi!
Reply
This is the cutest little guy ever! Thanks for sharing your great instructions talent and imagination! I hope my version does your justice!
Reply
Thank you so much, Diane! You’re so welcome for the tutorial! I’m glad you enjoyed it. I’d love to see what you make :).
Reply
Thank you very much for sharing this Tutorial and Pattern! It´s so cute!
Reply
You’re very welcome, Gladys! I’m glad you liked it!
Reply
I know you saw my finished version on Instagram but I wanted to post here in case anyone was thinking about creating this.
I have basic beginner sewing skills, and I thought this would be a stretch, but I followed the pattern, the instructions and the videos and had a great time making my very first softie. I have never sewn on a curve or stuffed anything before. But I went slow, and only had to start one piece over (the sock – I forgot it had a seam allowance so my first try ended up way too big).
This was a great experience and I’m sure it won’t be the last time I make something like this.
Thanks for all the work you’ve put into the patterns and the website.
Reply
I’m so glad to hear you had a great experience with the pattern! It makes me so happy to hear you enjoyed it! You’re deer is so adorable, too!
Reply
Thank you so much, Beautiful! 🙂
Reply
You’re so welcome, Angela!
Reply
He is adorable, thank you!
Reply
Thank you, Diane!
Reply
so very adorable! thank you for sharing your talent and free patterns
Reply
Thank you, Sharon! You’re very welcome!
Reply
This is so cute! Also, a quick question. I saw a really cute penguin plush on your instagram and I was wondering if you are going to publish a pattern for it. Thanks!
Reply
Thank you so much! Unfortunately, I do not plan to release a pattern for that particular penguin. I made him a few years ago before I started making less complex patterns to sell. I may make a different penguin in the future, though!
Reply
Thank you very much for this! I made it and it turned out really great and the boasting of the seam before doing the ladder stitch is a great idea, makes it much more neat. Will definitely use that in the future more.
Reply