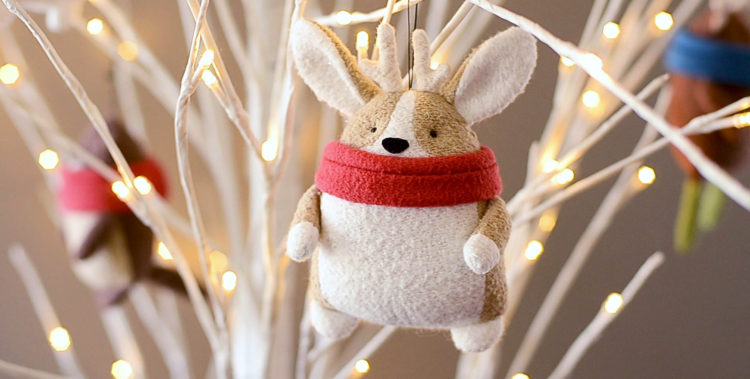
Free Christmas Plush Sewing Pattern and Tutorial – Full Size Plush and Ornaments
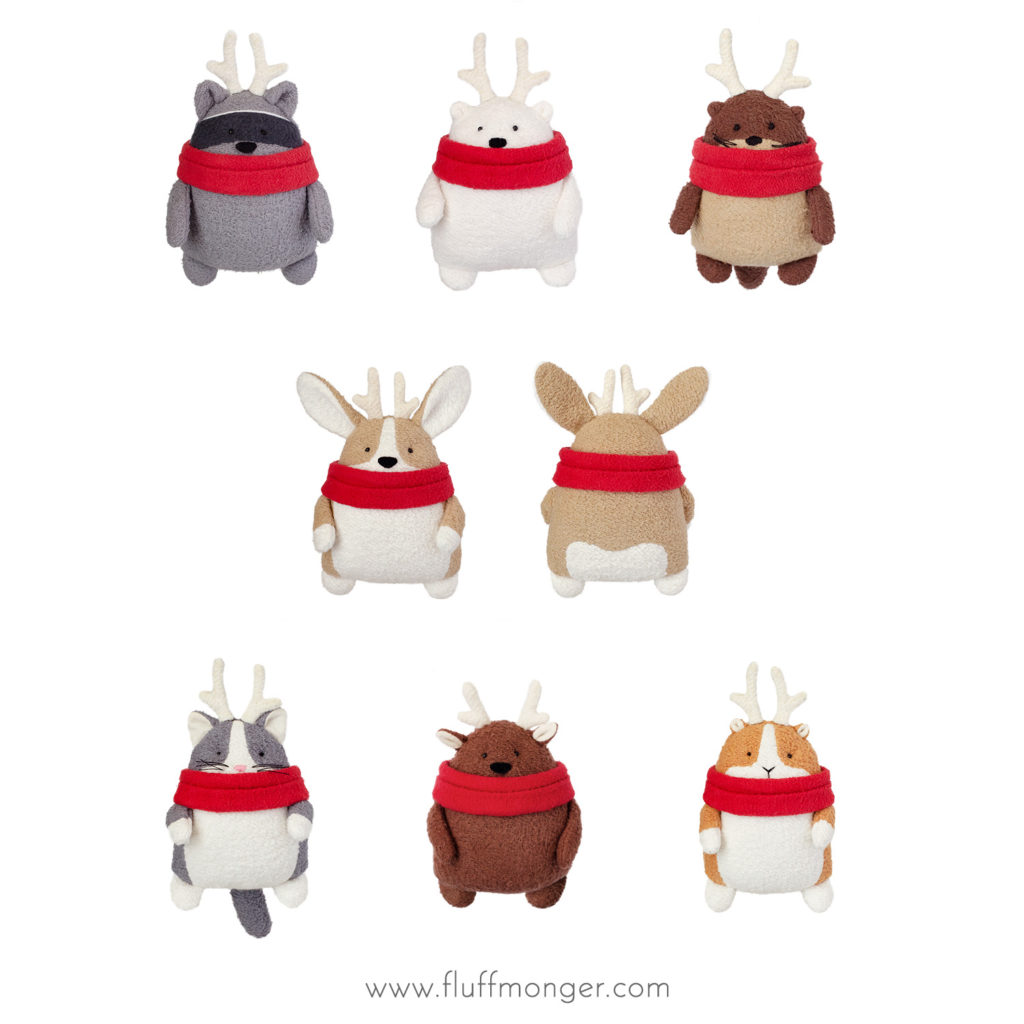
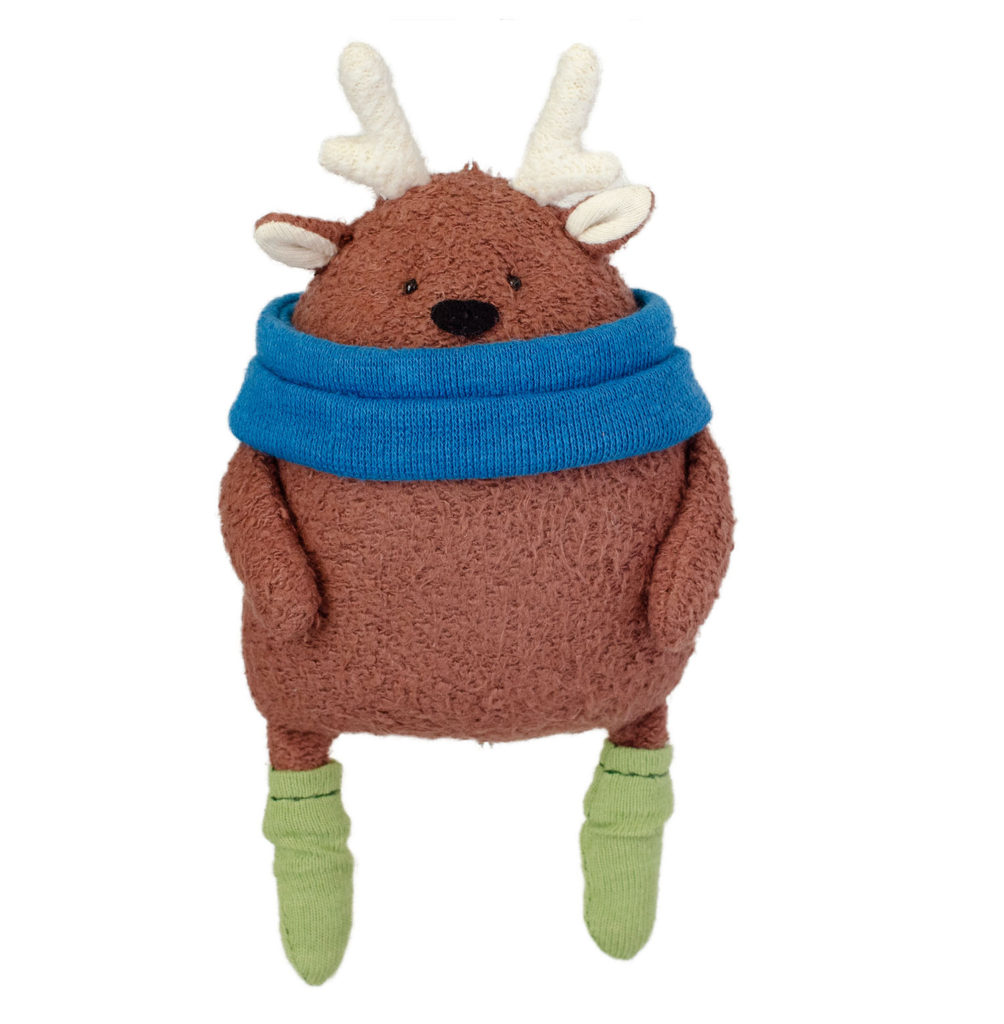
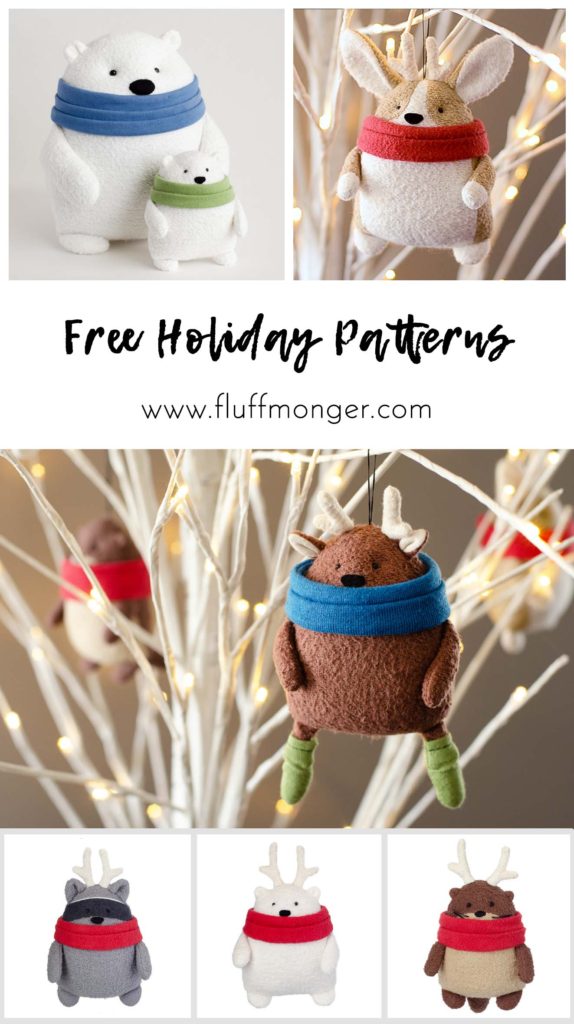
On November 23, 2018 by fluffmongerIt’s been almost a year since I released my free Christmas plush sewing pattern for Doodles the Deer! For this holiday season, I’m releasing a mash-up of Doodles the Deer and my other free patterns for making Christmas plush and plush ornaments! I’ve updated the Doodles the Deer pattern, so the arms, legs, antlers, and scarf can be interchanged among all the different animal patterns I’ve released. I’ve also finally made kits for Doodles the Deer as well as kits for all the Christmas plush and ornaments! So now it’s time to deck the halls with everything from cuddly stuffed reindeer corgis to reindeer raccoon ornaments!
The tutorial below includes photos and written instructions for making the new Doodles the Deer either with or without socks. It also shows how to make a scarf and add antlers to other animals in my free pattern library. You will want to refer to the respective tutorial for whichever animal body you choose to make.
Materials
You’ll need:
-
- Fleece in the indicated colors for your animal (see all free animal patterns and tutorials here and find kits for them here)
- 1/8 yard off-white fleece for antlers
- 1/4 yard fleece or jersey knit fabric for cowl scarf
- 1/4 yard jersey knit fabric for socks (optional)
- Stuffing (I’m using organic carded wool from a local farm, but I also like this organic roving*. You can also use fiber stuffing, like this one made from recycled plastic bottles*)
- Matching all-purpose thread (I carry organic thread in my Etsy shop)
- Marking tool (like this disappearing pen* or this water soluble pen*)
- Scissors
- Pins or clips*
Links with an asterisk (*) are affiliate links. If you make a purchase through one of them, I get a small percentage of the sale with no extra cost to you.
If you decide to sew your animals with natural fleece, I recommend using a 90/14 ball point needle; and if you sew with organic cotton thread, I recommend making your final stitch a stretch stitch (a stretch stitch is fairly permanent, so baste first when needed).
Printing the Patterns
If making a Christmas animal other than the deer, you will need to print both the pattern for the animal you wish to make and the antler and/or socks and legs from the new Doodles the Deer pattern.
Print pattern at 100%. (See a tutorial on printing and assembling patterns here.)
Tracing the Pattern
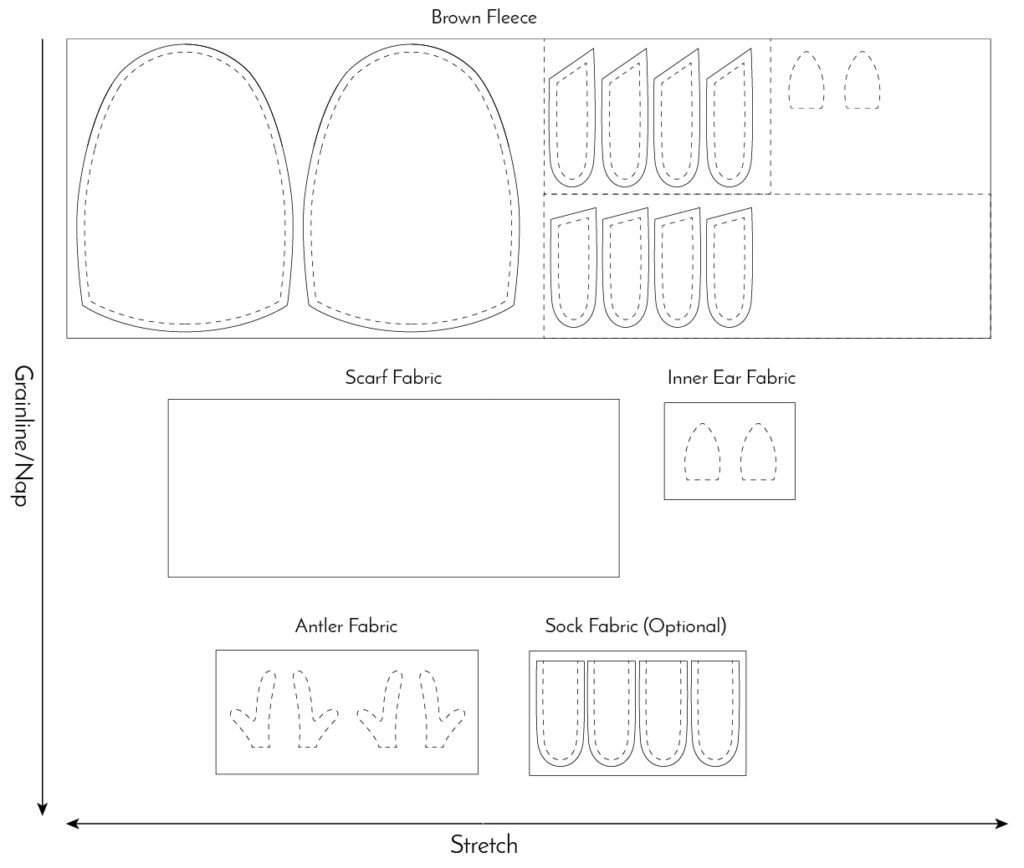
- Cut out pattern. I find it easiest to trace the stitch line for small pieces and sew on folded/layered fabric, so I’m using the arm, leg, ear, and antler pattern pieces with only the seam allowance at the very end (see first photo under ‘sewing the ears, arms, and legs’). The cutting layout below shows the body pieces for the new Doodles the Deer. Refer to the body layout for whichever animal you are making.
- Line up arrows with grainline/nap direction of fabric. Trace ONLY the body pieces and transfer all markings. Detailed instructions for tracing the ears, arms, legs, and antlers will be provided in the steps below.
Cutting Layout
Sewing the Ears, Antlers, Arms, and Legs
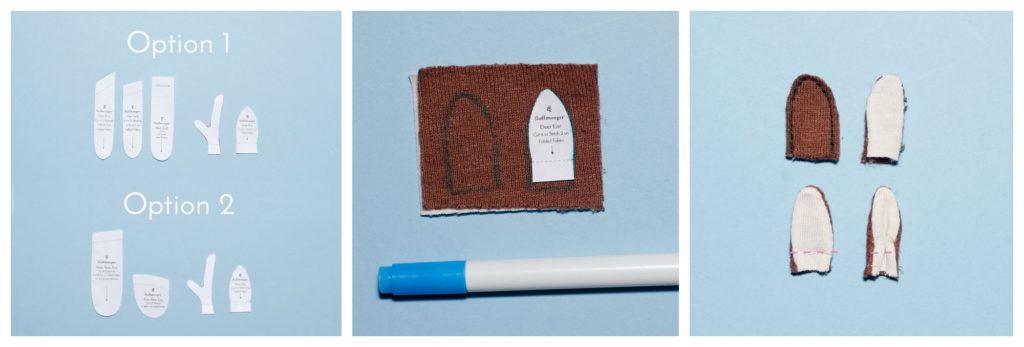
- Cut ear, antler, arm, leg, and tail pattern pieces so only the seam allowance at the very end remains. Option 1 makes a deer with skinny legs and socks. Option 2 makes arms and legs that match all of the other free animal patterns.
- Trace stitch line of ears on folded/layered fabric.
- Stitch around ears. Cut out with 1/8″ seam allowance. Turn ears right side out and run hemostat clamps/turning tool around the seams.
- Press if needed. Baste stitch ears 1/8″ from bottom edge.
- Fold outer edges of ears in toward the center at indicated markings. Baste stitch again to hold ears in folded position (you may need to baste by hand if making a tiny animal).
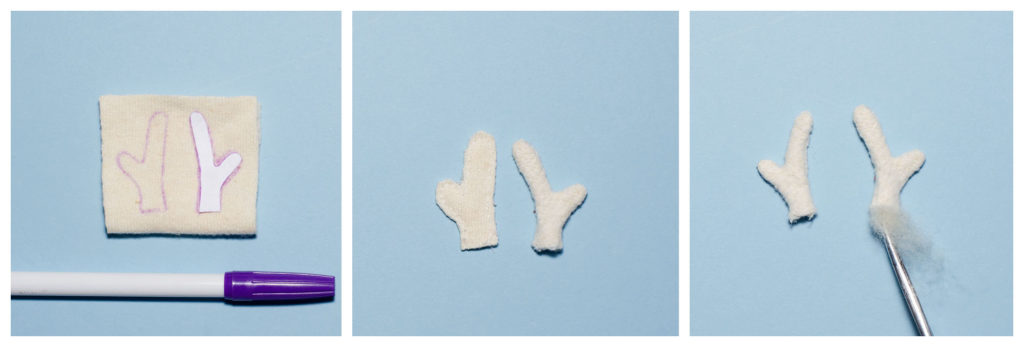
- Trace antlers on folded/layered fabric, stitch along trace line using a shorter the stitch length for the detailed curves on the antlers, and cut out with 1/8″ seam allowance. Clip curves. If making tiny antlers, you may want to make a test antler. The organic cotton fleece I used for this tutorial turns easily, but some types of fleece may be difficult to turn right side out.
Leg Option 1 (skinny legs with socks)
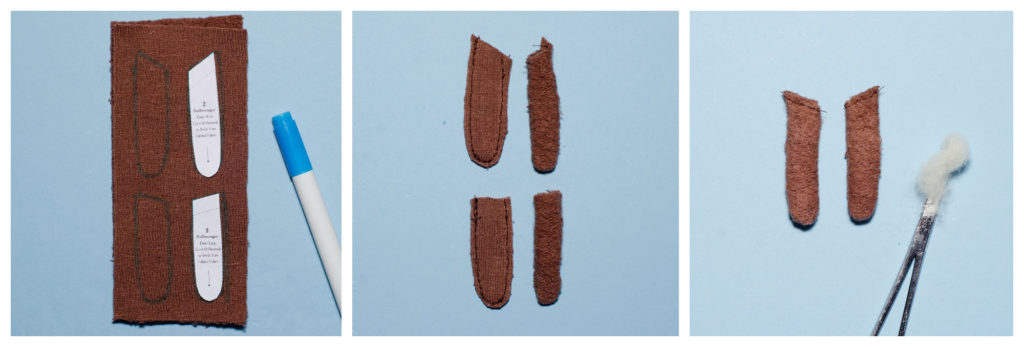
- Trace arms and legs on folded/layered fabric.
- Stitch along traced lines. Cut out arms and legs with 1/8″ seam allowance and turn right side out.
- Run hemostat clamps around the inside seams to help them fully open.
- Stuff arms about 2/3 full. Wait until the next step to stuff the legs.
- Baste arm openings closed 1/8″ from edge.
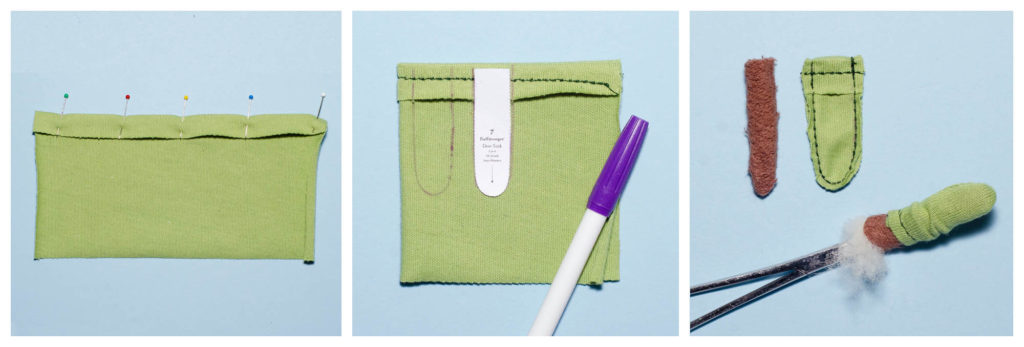
- Press a 1/2″ hem along length of sock fabric.
- Using a stretch stitch, stitch 1/4″ from edge. Fold fabric in half, trace the stitch line for the socks, stitch along traced line.
- Cut out socks with 1/8″ seam allowance. Turn right side out.
- Use hemostat clams to clasp the tip of the leg and slide leg into sock. Stuff legs about 2/3 full.
Leg Option 2 (wider arms and legs without socks)
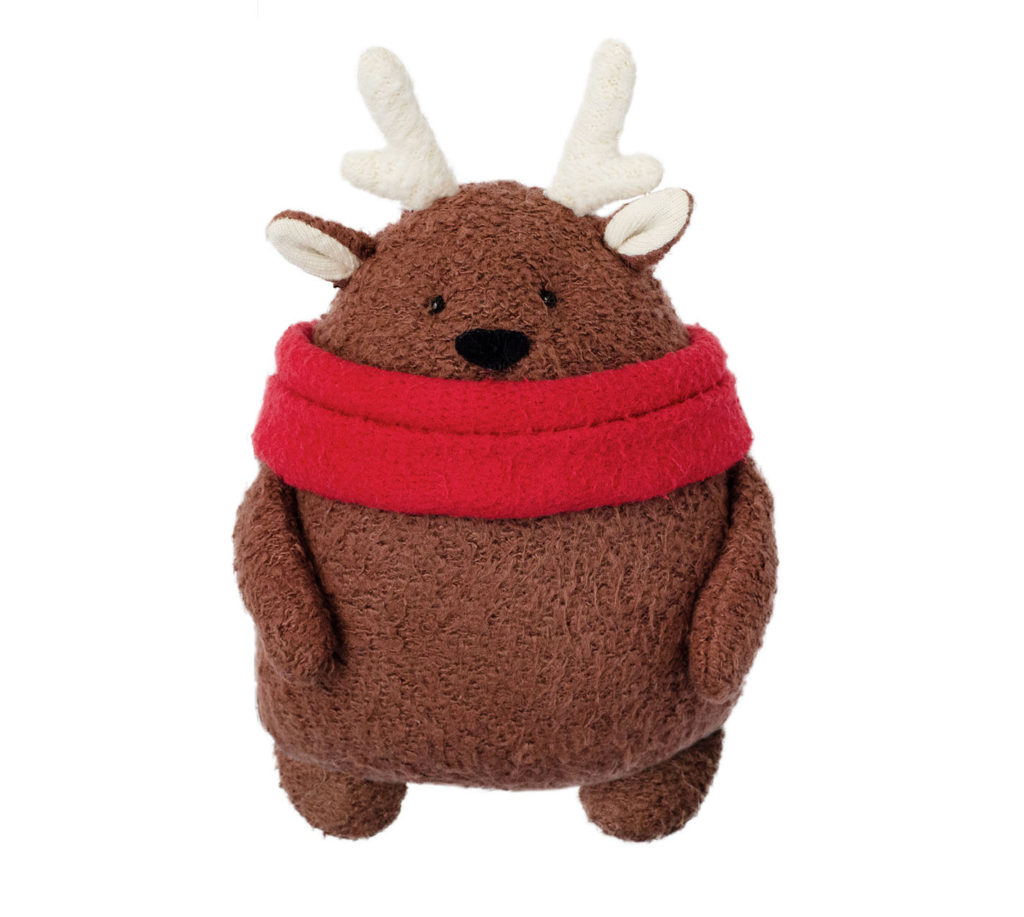
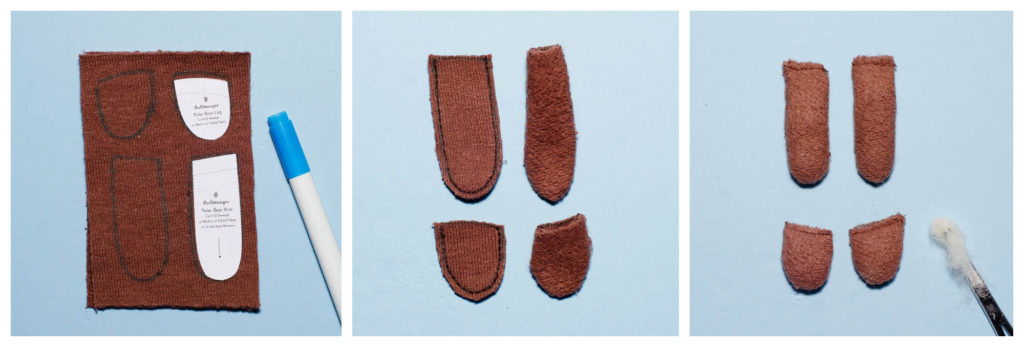
- Trace arms and legs on folded/layered fabric.
- Stitch along traced lines. Cut out arms and legs with 1/8″ seam allowance and turn right side out.
- Run hemostat clamps around the inside seams to help them fully open.
- Stuff arms and legs about 2/3 full.
- Baste arm and leg openings closed 1/8″ from edge.
Assembling the Body
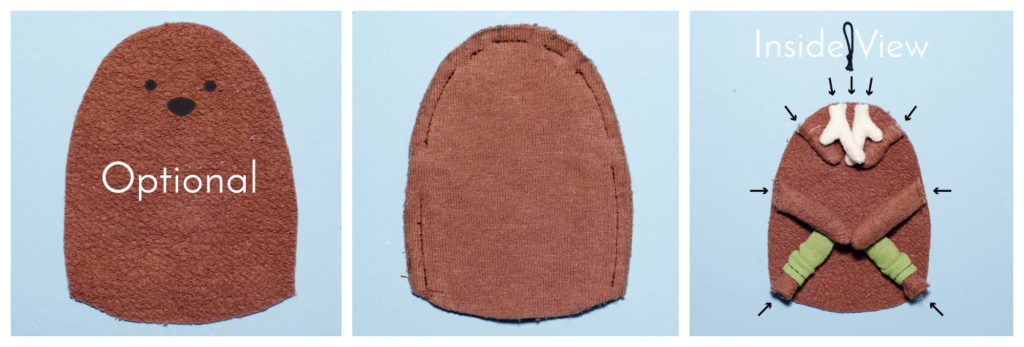
- Optional: At this point, you can make the eyes and nose, or you can wait until after stuffing (I like to wait until then end so I can needle sculpt the eyes). There are a few options for the eyes and nose below:
- If making a full-size animal, you can make the eyes and nose with felt and machine or hand-stitch them 1/8″ from edge. If using the sewing machine to stitch in place, you will need to stitch them on before going any farther with the tutorial.
- If making a tiny size or full-size animal, you can use a satin stitch for the nose and make embroidered knot eyes with embroidery floss or yarn (here’s a video tutorial on embroidering eyes with a French or colonial knot). This can be done before or after stuffing depending on your preference.
- If making a full-size animal, you can use glass eyes if your animal is not intended for a small child. (I have a tutorial here for using glass beads for eyes.)
- If making a full-size animal, you can use a plastic safety nose and eyes. Note that safety eyes/noses are not intended for small children, and I do not recommend using them with natural-fiber fabrics, like organic fleece. (Safety eyes typically require a small amount of fusible stabilizer or Fray Check to prevent holes in stretch fabrics.) Inserting safety eyes/noses can be done at this point or right before turning the polar animal right-side-out.
- With RIGHT sides together, stitch animal front to animal back, making a U-shape with openings for ears, antlers, and arms.
- Insert the ears, antlers, arms, and cord (if making an ornament) as shown in “inside view. Depending on which animal you are making, you may need to move the antlers closer together to maintain the proper spacing for the ears (see ‘inside view’ below for antler spacing for deer, corgi, and raccoon).
- Make sure the insides of the ears are touching the body side with the face. I recommend baste stitching the ears and antlers in place and turning your animal right side out to check their positions before making your final stitching. Stitch ears, antlers, and arms in place.
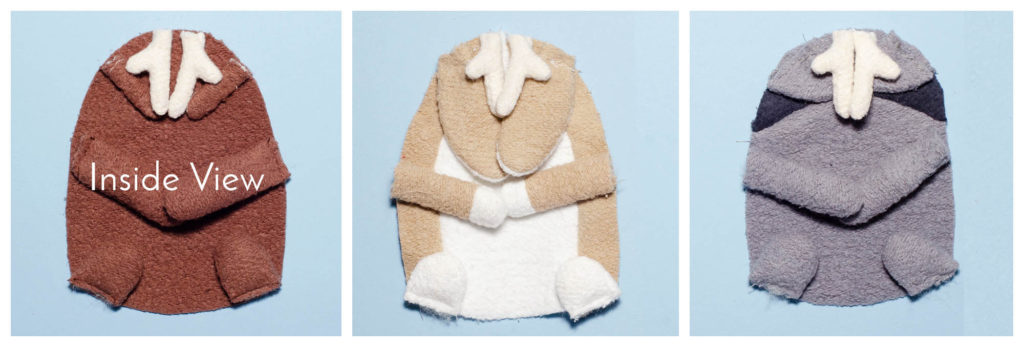
Finishing the Body
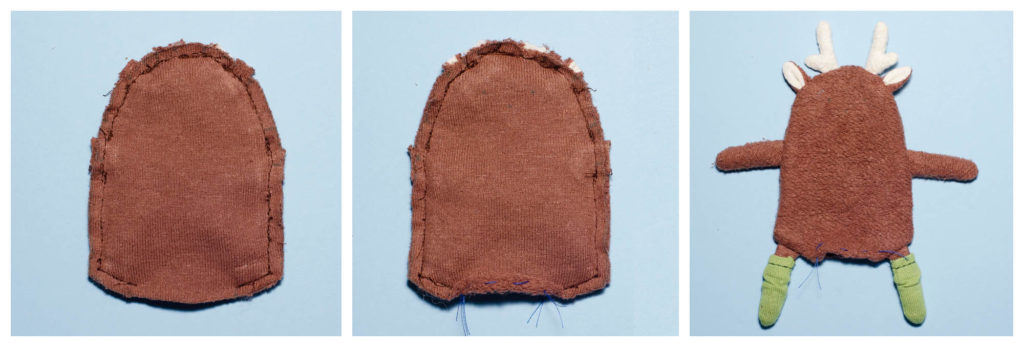
- Stitch legs into place, leaving an opening for turning.
- Baste the seam allowance around the opening. Clip curves and corners.
- Turn animal right side out (if you haven’t made your eyes or nose yet, make sure you have their positions marked on the right side of the fabric before stuffing).
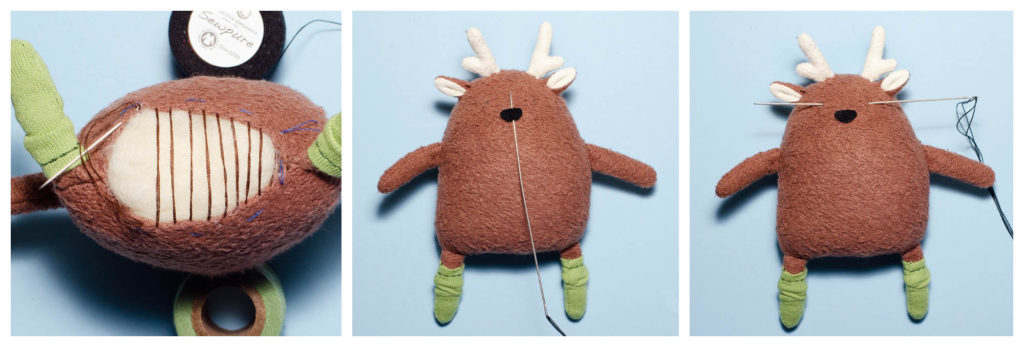
- Stuff the body firmly. Be sure to stuff the corners above the legs well, and continue stuffing as you close with a ladder stitch. Here’s a video tutorial on how to ladder stitch. Remove basting stitches after closing the opening.
- If you haven’t already, make the eyes and nose. For tiny animals, I recommend embroidering the nose with a satin stitch and the eyes with a colonial or French knot (in this detailed otter-making video, I show how to embroider the face at 1:06:32). If making a full-size animal using one of the organic kits, here is a tutorial for using glass beads for eyes.
Making a Cowl Scarf
If you’d prefer to crochet a scarf, I’ve provided crochet instructions for both a tiny and full-size scarf at the bottom of this section.
Sewn Cowl Scarf
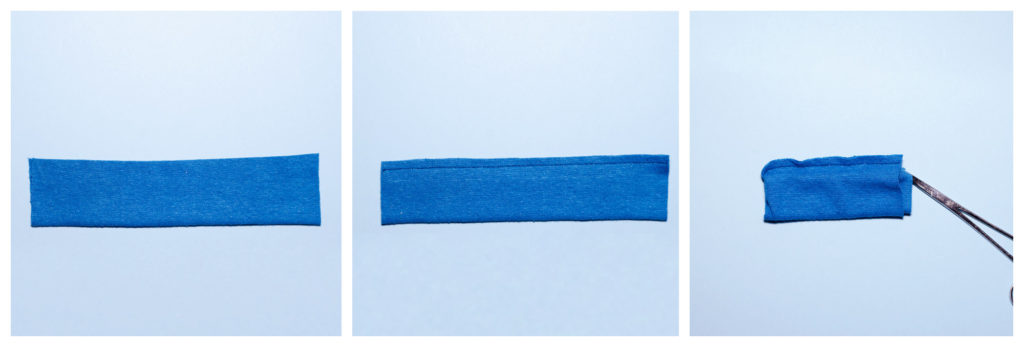
- For a full-size animal, cut an 8.5-in by X*-in piece of fleece or jersey knit fabric with the longest dimension along the cross grain (so the cowl can stretch when going around the neck).
- For a tiny size animal, cut a 3.5-in by X*-in piece of fleece or jersey knit fabric with the longest dimension along the cross grain (so the cowl can stretch when going around the neck).
*Measure the circumference around animal right under its nose. You’ll want your scarf to fit snugly under this area. Add half an inch (if using ¼-in seam allowance) to the amount you measured. We’ll call this final dimension ‘X.’ (My full-size deer measured 15.5-in around, so I added 1/2-in to get 16-in. So, for my deer, X=16-in.My tiny deer measured 7.5-in around, so I added 1/2-in to get 8-in. So, for my tiny deer, X=8-in.)
- Fold fabric lengthwise with RIGHT sides together.
- Using a stretch stitch or narrow zig-zag stitch, stitch along length of scarf with 1/4-in seam allowance.
- Reach hand through the inside of tube, grab ends of opening and pull through until the seam allowance of both openings match up.
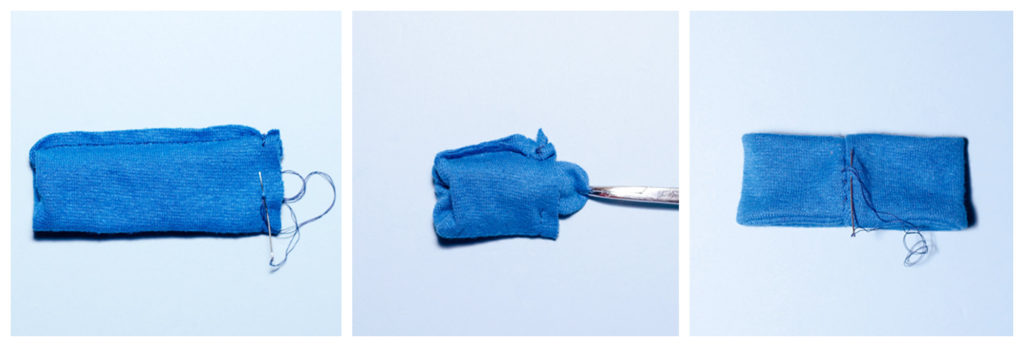
- Pin edges, and stitch around open ends with ¼-in seam allowance, leaving a 2-in opening for turning (for full size scarf) or 3/4-in opening (for tiny scarf). This step can be stitched by hand using a backstitch if needed.
- Flip right side out, fold raw edges of opening in with ¼-in seam allowance, and close with a ladder stitch.
- Slip over polar animal’s head and the top of arms to hold them down. Scrunch scarf a bit.
Crocheted Cowl Scarf (Full Size)
- Using worsted weight yarn and a G hook, chain 24.
- Row 1: Starting in the third chain from the hook, double crochet in next 22 stitches, chain 2, and turn work.
- For the following rows (you may need more or less depending on the stretch of your fabric and how much you stuffed your animal), double crochet BLO (back loop only) in next 22 stitches, chain 2, and turn work. When you get to your final row, either slip stitch the two ends of the scarf together or fasten off and sew ends together.
- Slip over polar animal’s head and the top of arms to hold them down.
Crocheted Cowl Scarf (Tiny Size)
- Using worsted weight yarn and an E hook, chain 7.
- Row 1: Starting in second chain from the hook, single crochet BLO (back loop only) in next 6 stitches, chain 1, and turn work.
- For the following rows (you may need more or less depending on the stretch of your fabric and how much you stuffed your animal), single crochet BLO in next 6 stitches, chain 1, and turn work. When you get to your final row, fasten off.
- Slip stitch or sew ends together. Weave in ends.
- Slip over polar animal’s head and the top of arms to hold them down.
Organic Fabric Kits
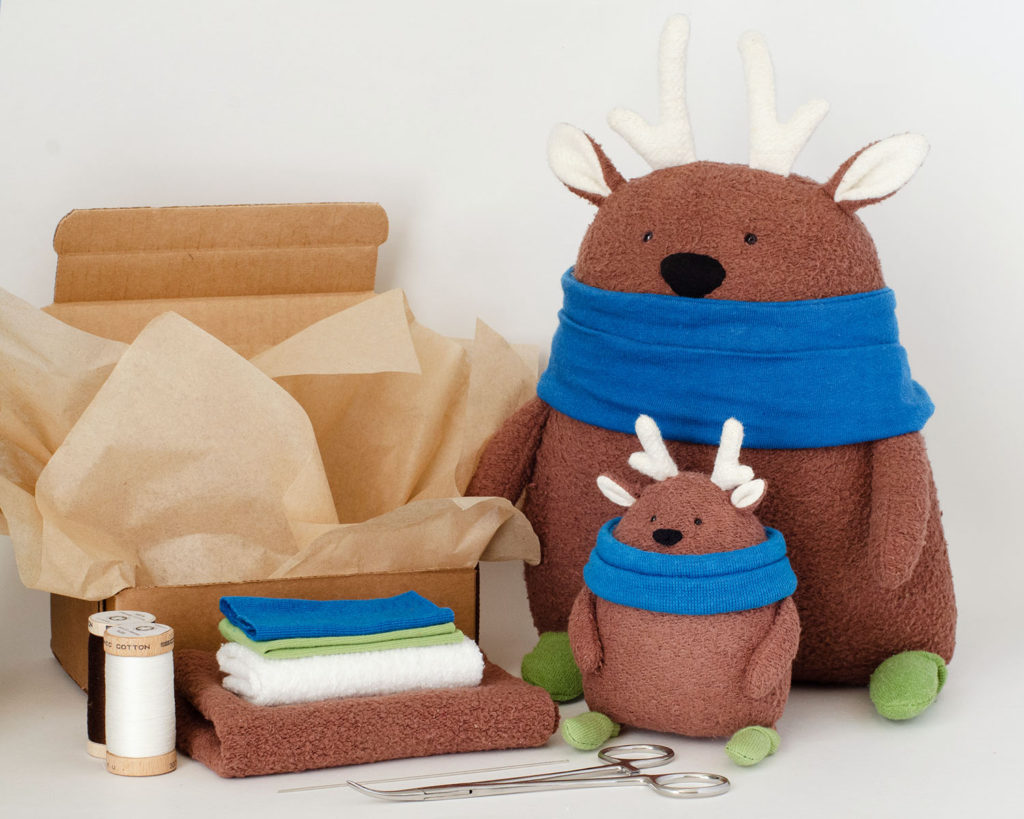
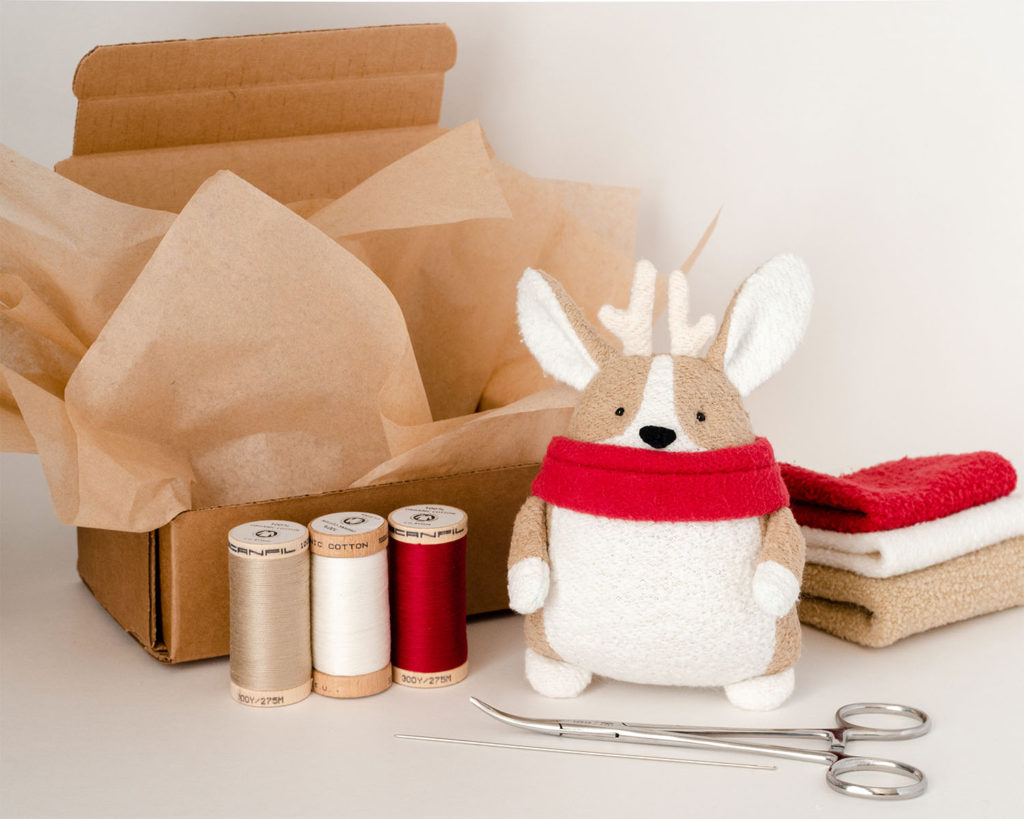
If you’d like to try sewing a Christmas animal or an ornament with organic fabric, I have fabric kits available with just the right amount of hand-dyed organic fabric to complete the project.
Show Me Your Holiday Creations!
I’d love to see what you make with this pattern! Post your photos in my Fluffmonger Patterns group on Facebook or share them with Fluffmonger on social media using #fluffmongerpatterns!
Selling Items Made with this Pattern or Creating Derivative Works
This pattern may be used to create handmade toys to sell, but items may not be mass-produced. Please give credit to Fluffmonger with “pattern by Fluffmonger” and a link to my website, www.fluffmonger.com on your tags and listings.
If you modify the pattern or use certain pieces to create another pattern, still credit Fluffmonger, as these are considered derivative works.
This design is protected by federal copyright law (© 2018) and may not be reproduced in any form. Reproduction of this design, either in part or whole, or distribution of this pattern electronically or by hard copy is strictly prohibited.
37 comments
Leave a Reply Cancel reply
Archives
- March 2021
- February 2021
- April 2020
- January 2020
- November 2018
- July 2018
- April 2018
- March 2018
- February 2018
- January 2018
- December 2017
- November 2017
- October 2017
- March 2017
- February 2017
- November 2016
- October 2016
- September 2016
- August 2016
- July 2016
- June 2016
- March 2016
- February 2016
- January 2016
- December 2015
- November 2015



I love your patterns. When my sewing room is back together, I cannot wait to get started. Thank you!
Yay for getting your sewing room in order! Hope you have a blast with holiday crafting! Thank you so much!
Thank you so very much for sharing your adorable patterns!! I just love these!
You’re so welcome, Denise!
This is soooooo adorable! I have had BIG problems with the pattern in terms of attaching the arms and legs ( they kept not getting sewn in!) but I see how the thicker arms and legs will be easier. Now, Doodles, you are MINE!!!!
Lol, Rebecca! I hope new Doodles works out better for you. You can always pull the arms and legs out of the body a bit so you have more room to manage the seam allowances when you sew. Doodles won’t mind having shorter arms and legs ;). Good luck with new Doodles!
These are really gorgeous creatures and will bring smiles to the faces of many people of all ages. Thank you so much for sharing the patterns and for the clear instructions on how they can be made. And Merry Christmas to you.
Thank you so much for your sweet comment, Christine! I hope you enjoy making them, and Merry Christmas to you as well!
Thank you so much! Each of his creations generates a big smile on my face! They are beautiful and sweet Christmas gifts! I wish you from the heart, that you spend the best upcoming holidays in health, love and family! A big hug from Argentina!
Aww, thank you so much, Gladys! I hope you have a wonderful holiday season as well!
Fantastic! You did it again. What a great idea.
Thank you so much, Missy! I hope you enjoy making them!
I would love a whole room full of these (some giant sized) to dive into!
That would be fun! Thank you so much!
What an amazing Christmas make. I am definitely going to be trying these. Such a detailed tutorial. Thank you
What an amazing Christmas make. I will definitely be trying to make these cute little creatures. Thank you for such a detailed tutorial.
Thank you so much, Jane! I hope you enjoy the patterns! I’d love to see what you make if you want to post your photos in the Fluffmonger Patterns group on Facebook!
merci de partager vos tutoriels bonne fêtes de fin d’année
Thank you! Happy Holidays to you as well!
I was walking my corgi, Tucker, this morning when a woman on a bicycle went by. Without stopping, she shouted, “I’ve been sewing toy dogs just like him! Google Fluff Monger! You can make a dog just like him!”
“Google WHAT??”
“FLUFF MONGER!” she shouted over her shoulder, never stopping.
I am SO glad I heard her the second time, and even happier to find your dorb patterns. It truly made my day.
I am also hoping the bicycle lady will see my comment here, THANK YOU, BICYCLE LADY!
And thank YOU for sharing your patterns. I want to make my own corgi soon. I want to figure out how to make him tricolor, to look more like my Tucker. And, maybe Velcro the hands and heart so he can hold some other things?
This made my day :). It makes me happy to know someone is yelling “Fluffmonger” to strangers while riding around on a bicycle! You can certainly add velcro to the paws so you can interchange objects the corgi holds. I’ve also seen a number of people make tri-color corgis with the pattern. There may be some posted in my sewing group page on facebook: http://www.facebook.com/groups/fluffmonger-patterns. Feel free to post any questions there. I only check my blog comments every week or so. Thanks again for sharing your story!
Congratulations! There is now a corgi out there named Fluff and her buddy is named Monger. The kind lady seeing my blank look, said, (wait for it….) Google it! FluffMonger, you will love it! So I got to cuddle two adorable corgis then visit your website. Best day ever!
I have downloaded the Mr. Floof pattern for my next project.
Hi, Zuzanna! So there are real corgis named Fluff and Monger?! I would love to see them! Thank you so much for making my day with your sweet story!
It turned out that making such a nice and unique Christmas present with your own hands is not difficult at all having your advice and understanding of each stage of the work.
I’m so happy to hear that!
I clicked on the PDF button to download the patterns. When I go to my Downloads folder and click on the item, I get the message “file corrupted” and no pattern to print. Do you have any suggestions for me? Thank you! We have had corgi’s since 1982 and I am so excited to sew a Quigley.
Hi, Nancy! I just checked, and the file downloads properly. Perhaps try again with a different browser. I love that you are passionate about corgis!
Is one of the animals a Guinea pig?
Yes, it is. Sorry for the late reply.